Sunday, October 25, 2009

Savory Butternut Squash Soup

I love butternut squash soup.


savory butternut soup

But honestly, I am not a fan of sweet squash soups.

I know, I know, you have a recipe that will change my mind, right? Oh, I will say this as sweetly as I possibly can...uhm, (big smile)..no, you won't (STILL smiling, if that helps soften the blow).

I'll admit, apple and butternut squash IS a classic fall pairing, and everyone loves and makes this soup every season. It's just, well, this is my food blog, and I love, love, love savory squash soups!

Today's recipe is more of a suggestion. It is not important to follow a strict set of measurements in this dish, so feel free to tweak, adjust, delete, or modify this soup in anyway that suits your palate.

Savory Butternut Squash Soup w/Smoked Paprika Seeds
and Creme Fraiche

2-3 lbs Butternut Squash
1 med. yellow or white onion, cut into chunks
2 tablespoons olive oil, or unsalted butter
2-3 Cloves Garlic chopped
1 bay leaf
4 stems Fresh Thyme (Leaves and stems) or 1 teaspoon dried
4-5 leaves fresh Sage or 1 teaspoon dried
Water or veggie stock to cover (I use water)
1-2 tablespoon fresh lemon
1/4 cup cold unsalted butter
Kosher salt
Fresh ground pepper

Preheat oven to 350.

Cut butternut (or any winter squash) in half, remove seed and save for later use. Place squash, cut side down on sheet pan and cook for 30-40 minutes or until a sharp knife pierces the flesh easily. Once cooked, remove squash from oven and cool, then scoop out flesh.

Put a 5 quart soup pot on medium heat, add oil and wait for one minute then add onion, garlic, bay leaf, sage and thyme. Gently cook or sweat (sweat: means to cook without caramelization.. no color) onions until translucent. Now add butternut squash and enough water or veggie stock* to cover contents and simmer for 10 minutes. Turn off the heat, remove bay leaf and thyme stems and puree soup in small batches. Be very careful with this hot soup in a blender! Season with butter, salt, pepper and lemon juice (lemon juice brightens the soup and creates more dimension, trust me) . Taste and adjust seasonings.

Toasted Seeds: Remove seeds from squash (leaving some of the string on the seeds is fine), toss seeds with a teaspoon or two of olive oil, a pinch of kosher salt, fresh ground pepper and 1/2 teaspoon smoked spanish paprika. Spread seeds onto a sheet pan and bake at 350 degrees for 5-8 minutes or until the seeds begin to smell fragrant and are toasty. Remove from oven, and pour onto a plate to cool. Reserve for garnish.
*Note: I don't care to use chicken stock as it "muddles" the flavor of the soup. I prefer pure clean flavors, so I use water or veg. stocks.

To plate: Ladle soup into hot bowls, garnish with toasted pumpkin seeds. I used house made creme fraiche, but sour cream or yogurt also works nicely.

Enjoy!

One more week at the LFM..
Chef Deb

Butternut Squash Biscuits and Honey Cinnamon Butter

It was windy, and while I spent almost as much time holding the tent down, it was great to be back at the Farmer's Market! At this time of year, the winter squash are plentiful, and the farmers have a bumper crop.

Butternut squash biscuits

This recipe uses the basic Southern Biscuit recipe, replacing 1/2 cup of the buttermilk with the same quantity of pureed butternut squash.

Halve the squash and remove the seeds and strings. Place on a roasting pan, flesh side down. Bake in a preheated 350 degree oven for 30 to 40 minutes or until fork tender. Remove the squash from the oven, scoop out the flesh and place in a food processor. Puree until smooth.

Prepare the biscuits as directed in the basic recipe. The biscuits will need to cool about 10 minutes before serving, as they are a little more moist then traditional Biscuits.

The perfect topping for these biscuits is Honey Cinnamon Butter.
In a medium bowl, combine 1/2 cup of softened, unsalted butter, 1/2 cup of honey, and 1 teaspoon of ground cinnamon. Beat until light and fluffy.

Enjoy!

Chef Deb
(post by Chris Ward)

P.S. Only one more Saturday to visit The Longmont Farmer's Market this season!!


Sunday, September 20, 2009

Chocolate Raspberry Jam

It's a cold rainy day, my iPhone died and I have a good burn on my right hand. All the more reason to stay home and eat chocolate!

Chocolate Jam

The original title for today's offering was, "Chocolate Raspberry Sunday Topper", which of course, you may certainly use this recipe for that purpose. However, we tweaked the original recipe, doubled the Cocoa, increased the lemon juice and added a nice chili powder (purely optional). This, my friends, leaves the original recipe in the dust. Now we have an honest to goodness, pass the spoons around, lick the jar clean, Chocolate Jam!

CHOCOLATE JAM!

Yes, I'll wait until your pulse slows down.

I know what you're thinking. You must be doing something right in order to have lived long enough to have chocolate for breakfast.

I know, it makes me happy too!

My little group of "Canning B's" (my Sept. 20 canning class) decided this would be delicious over a nice round of warm French Triple Cream Brie, with toasted brioche. I will let you decide.

Note: This recipe can be halved, and it can be put in glass jars and kept in the fridge for at least a 2-3 months if you choose NOT to can it. I promise you this, it will not last very long.

Chocolate Raspberry Jam
Makes: ( 6) 8oz. jars or (12) 4 oz. jars

1 cup sifted unsweetened Cocoa Powder
1 Package (1.75 oz) regular powdered fruit pectin
4 1/2 cups Crushed red Raspberries (use frozen, or freeze fresh berries for higher Juice yield)
8 Tbl Lemon Juice (you must use bottled lemon juice, they do make an organic one)
6 3/4 cups granulated sugar
2-3 Tbl ground Pasilla chili powder (optional)

1. Prepare canner, jars, lids (if you've taken my class, you KNOW how to do this!)

2. In a medium bowl combine cocoa powder and pectin, stirring until evenly blended, set aside.

3. In a large stainless saucepan ( 2- 3 quarts), over low heat , combine crushed raspberries and lemon juice, whisk in pectin/cocoa mixture until pectin is dissolved. The mixture will look “muddy”. Raise heat to medium high and bring mixture to a boil, stir frequently. Next, add sugar all at once, stir and return to a full rolling boil (you may need to raise heat to high) for one full minute, stir constantly. Remove from heat and skim off foam. Add Pasilla powder at this time if using.

4. Ladle hot Jam in to hot jars, leaving 1/4 inch of headspace. Remove air bubbles from the jar with a knife, and adjust head space, by adding more jam if needed. Wipe rim, center lid on jar and screw band down until resistance is met, then increase to fingertip tight.

5. Place jars in canner, ensuring they are completely covered with water, and place lid on pot. Bring water to a boil and process for 15 minutes (for Colorado) ; 10 minutes at Sea Level. Remove lid from canner, wait 5 minutes, then remove jars, cool 12-24 hours before moving. Label and store.

Enjoy,


Chef Deb T

chocolate jam on ice cream

Our Next Canning Classes:

Saturday, Sept. 26, 2009 10:00a -1:00p Fee: $55 p/p
Saturday, Oct. 10, 2009 10:00a -1:00p Fee: $55 p/p

Space is still available:

303.817.4313

Friday, August 21, 2009

Killer Carrot Relish

Photo and comments soon...

Killer Carrot Relish
18 carrots
4 green peppers( Jalapeno, serrano, etc.)
4 red peppers (bells, fresno, Johnny Nardello)
1-2 onions
1/2 cup salt
3 cups sugar
6 cups vinegar
2 T mustard seed
2 T celery seed (I used pink peppercorns at the market

Chop all vegetables using food processor (I use the grater attachment). Pour salt over vegetables and let stand for 2 hours in a glass, ceramic, or plastic bowl. Drain vegetables. Put remaining ingredients into a large pot, and add vegetables. Bring to a boil. Pack into hot, sterilized pint sized jars. Process in boiling water bath for 15 minutes. Check to make sure jars have completely sealed. Yield: 8 pints (give or take)

Note: If you do not can, smaller batches of relish may be stored in the refrigerator for up to 3 months.
Enjoy!

See you at the Market!

Chef Deb

Tuesday, August 18, 2009

Big Crumb Apple Coffee Cake w/ with extra Crumbs

applecrumbcake


Big Crumb Apple Coffee Cake


For the apple filling:
1/2 pound tart apples, peeled, seeded, chopped
1/4-cup sugar
2 teaspoons cornstarch
1/2-teaspoon ground allspice

For the crumbs topping:
1/3-cup dark brown sugar
1/3 cup granulated sugar
1-teaspoon ground cinnamon
1/2-teaspoon ground ginger
1/8-teaspoon salt
1/2 cup (1 stick or 4 ounces) unsalted butter, melted
1 3/4 cups all purpose flour

For the cake:
1/3-cup sour cream
1 large egg
1 large egg yolk
2 teaspoons vanilla extract
1 cup all purpose flour
1/2 cup sugar
1/2 teaspoon baking soda
1/2-teaspoon baking powder
1/4-teaspoon salt
6 tablespoons softened butter, cut into 8 pieces.

For filling:
toss apples with sugar, cornstarch and allspice. Set aside.

1. Preheat oven to 325 degrees. Grease an 8-inch-square baking pan.

2. To make crumbs in a large bowl, whisk sugars, spices and salt into melted butter until smooth. Then, add flour with a spatula or wooden spoon. It will look and feel like solid dough. Leave it pressed together in the bottom of the bowl and set aside.

3. To prepare cake, in a small bowl, stir together the sour cream, egg, egg yolk and vanilla. Using a mixer fitted with paddle attachment, mix together flour, sugar, baking soda, baking powder and salt. Add butter and a spoonful of sour cream mixture and mix on medium speed until flour is moistened. Increase speed and beat for 30 seconds. Add remaining sour cream mixture in two batches, beating for 20 seconds after each addition, and scraping down the sides of bowl with a spatula. Scoop out about 1/2 cup batter and set aside.

4. Scrape remaining batter into prepared pan. Spoon apples over batter and dot reserved batter over apples; it does not have to be even.

5. Using your fingers, break the topping mixture into big crumbs, about 1/2 inch to 3/4 inch in size. (They do not have to be uniform). Sprinkle over cake. Bake cake until a toothpick inserted into center comes out clean of batter (it might be moist from apples), 45 to 55 minutes. Cool completely before serving. Enjoy!
Yield: 6 to 8 servings.

I like to serve this cake with Salted Caramel Sauce (recipe coming soon).

See you at the Market!
Chef Deb

For Classes, and Farm to Table Schedules visit:
www.CooksStudio.com

Wednesday, August 12, 2009

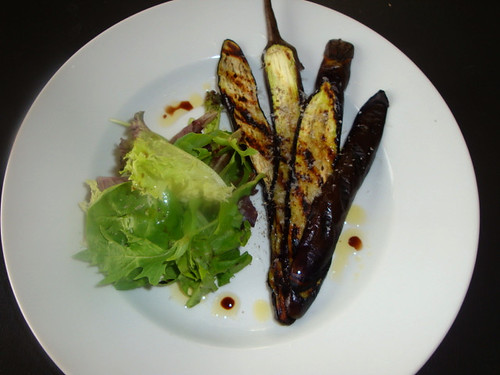
Grilled Japanese Eggplant.....

and Isabelle Farm.

Several weeks ago, I was invited to visit a great little farm located on Isabelle Road, between Hwy 287 & 95th Street. Many of you will recognize the Isabelle Farm stand at LFM as being on the east strip, right next to Hazel Dell Mushrooms. When you go to the Market on Saturday, introduce yourself to Ben Bowditch, the farm's field manager, and ask him to show you the produce he is most excited about. Like all growers, he's got a thing or two to say about what they grow, and it's inspiring to hear that kind of enthusiasm in someone else besides the Market Chef.

Isabelle Farm is an organic farm, owned and operated by Jason and Natalie Condon. They just completed and opened a beautiful farm stand to provide access to everything they grow on a daily basis. Click on this link to find out more about Isabelle Farm and sign up for their newsletter!

DSC01210

Grilled Japanese Eggplant

1-2 lbs. Japanese Eggplant, sliced horizontally
Extra Virgin Olive Oil
Kosher Salt
Pepper
Haystack Goat Feta (optional)

Heat your charcoal or gas grill to high, lightly oil grill rack.

Using a pastry brush lightly oil eggplant on both sides. Place eggplant on grill and allow to cook for 3-4 minutes, turn eggplant a quarter turn, and continue to grill for an additional 3 minutes. Turn the vegetables over and grill for 3 minutes more. Remove eggplant from grill onto a serving plate, drizzle with a few more drops of good quality olive oil, season with salt, pepper and a few teaspoons of Haystack Goat Feta. Enjoy.
* Note: an indoor grill pan works nicely. The eggplant is also good cold and served as a sandwich component.

See you at the Market!

Chef Deb

Final Note: The lovely fingerling potatoes in our creamy french potato salad came from Isabelle Farms!

Saturday, August 8, 2009

Kettle Corn Ice Cream

I know it sounds strange. But, if chocolatiers can put bacon in chocolate, then why can't we use salty/sweet kettle corn in ice cream?

I have been playing with the idea of Kettle Corn Ice Cream for quite some time and I approached Huck (LFM, Huck's Kettle Corn) about the idea and he was all for it! I just needed the right time to unveil this marvelous concoction and when the Boulder County Fair opened this month, I knew the time had arrived.
Ice Cream and Kettle Corn, two fair favorites all in one... My only problem was trying not to eat it all before we actually had to sample it out.

I knew I wanted to infuse the custard base with the popped kernels, but I was not sure how well the actual popcorn flavor would hold up to the dairy and the eggs.
It turns out, it works beautifully! The taste is subtle with a hint of salt and sweet, then it finishes with a nice popped corn taste.

This was a huge hit at the market this weekend and it was a home run for me, on so many levels.

Look for the recipe and the photos in The Longmont Times-Call in the next few weeks, ( as soon as it appears in the paper I will provide the link) Update: Kettle Corn Ice Cream

Note: If possible, make the custard the day before you plan to churn and freeze it. The corn flavor improves with time (8-24 hours).

Kettle Corn Ice Cream


3-4 cups of Huck’s Kettle Corn (Longmont Farmer's Market)
3 cups whole milk
1 cups heavy whipping cream
1/2-cup sugar
4 egg yolks

Place the Kettle Corn, milk and the heavy cream into a medium saucepan, over medium heat. Bring the mixture just to a simmer, stirring occasionally, and remove from the heat. Strain and reserve liquid.

In a medium mixing bowl whisk the egg yolks until they lighten in color. Gradually add the sugar and whisk to combine.

Temper* the cream mixture into the eggs and sugar by gradually adding small amounts, until about a third of the cream mixture has been added. Pour in the remainder and return the entire mixture to the saucepan and place over low heat. Continue to cook, stirring frequently, until the mixture thickens slightly and coats the back of a spoon. Pour the mixture into a container and allow to sit at room temperature for 30 minutes.
Place the mixture into the refrigerator and once it is cool enough not to form condensation on the lid, cover and store for 4 to 8 hours (this is called proofing, and ice cream custard improves with time) or until the temperature reaches 40 degrees F or below.
Pour into an ice cream maker and process according to the manufacturer's directions. This should take approximately 25 to 35 minutes. Serve as is for soft serve or freeze for another 3 to 4 hours to allow the ice cream to harden.

*Temper-Slowly add small amounts of hot liquid to eggs while whisking. Tempering slowly, allows the eggs to increase in temperature without scrambling them.

See you at the Market!

Chef Deb T
*Canning classes w/ Ann Zander - CU extension of Boulder County,
August 20, 2009 ( more dates TBA)
5:30-9:00
Class schedule: www.CooksStudio.com

Tuesday, August 4, 2009

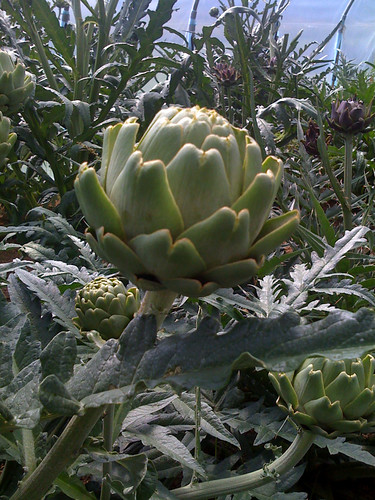
Grilled Colorado Artichokes and Behrmann Farm

Last week, Susie (volunteer extraordinaire) and I, had the opportunity to visit Behrmann Farm and check out their crop of Colorado Grown Artichokes.

I will repeat that, C-O-L-O-R-A-D-O artichokes.

Yes, Artichokes, IN Colorado.

DSC01188

When Kim Dirkes offered to let us visit the family's 101 year old farm, and have a peek at her artichoke plants, I had no idea what to expect. Nestled right behind Haystack Mountain, Behramm Farm is large, gorgeous, and picturesque, even by Colorado standards. In addition to their traditional crops, they also have old growth fruit trees (peaches, apples, cherries, black walnuts) vines and bushes!

Of course, I fawned over all the beautiful artichokes plants growing in her greenhouse. In retrospect, to say I was fawning might be a bit of an understatement. I would have wrapped my arms around each one had they not been full of thistles!

At one point, as it always does, came the question that gave me pause, "how much do you want for the market?"

I have to be very careful with this open ended question. You see, artichokes are a favorite in my house, and I had to try extremely hard not be greedy, and say, "how about ALL of them?" Kim generously donated a large supply "to play with", and I floated back to the car with visions of perfectly prepared artichokes, an endless supply of hollandaise, and miraculous last minutes phone calls for sleep-overs for the girls.

IMG_0449

Traditionally, artichokes need a longer growing season then our climate can provide. Therefore all the artichokes on the farm are grown in a large hooped greenhouse. Fortunately for us, there are plans to build an another structure to increase the size of their crop. Selfishly, I hope we can create enough of a demand at our market, over the next few years, to see the additional greenhouse built.

Lat week I decided to make grilled artichokes for the Farmer's Market. The recipe is a simple one. Although artichokes are labor intensive, I enjoy the process of peeling away the leaves and slowly arriving at the those last tender morsels; the bottom, the heart and the stem.

Grilled Colorado Artichokes

Artichokes:
*Trim the bottom two layers of leaves off with a paring knife (I also peel the step because the center is edible as well).
*Using scissors, cut the pointed tips off each leaf.
*I cut my artichokes in half ( I leave the fuzzy "choke" in, and boil it first, then remove the softened choke. I do this to save time, and to get the vegetable in the boiling water before it oxidizes)
* To reduce oxidation or browning: Rub with a cut lemon or put prepped artichoke in a bowl of lemon (acidulated) water; or in water containing a large amount of salt (for every 2 quarts of water, use 1/4 cup kosher salt)

Olive oil
Salt
Pepper
Butter, melts
Lemon Juice.

In a 5 quart pot, bring 4 quarts of water to a boil add 4 tablespoons of salt. Add the artichokes and simmer (the term is "blanching") until a sharp paring knife will pass easily through the base of the vegetable. It could be 15 minutes or it could be 45.

Remove the artichokes from the boiling water and place them in a bowl of ice water (the term is "shocking") and cool, until the vegetable is no longer hot Drain.

Blot the artichokes dry, remove the fuzzy choke with a spoon.

Heat your grill or a grill pan for 5 minutes on medium high.

Drizzle vegetable with olive oil, salt and pepper and place them on the grill cut side down. Cook until the surface begins to turn a nice golden brown. Turn them over and cook for an additional 2-3 minutes. Remove artichokes from the grill, drizzle with a little melted butter, and a few squeezes of lemon, additional salt and pepper.

Enjoy.

See you at the Market!

Chef Deb

Note: Behrmann Farm has a bumper crop of Apples and Peaches this year, and would like to invite a few small groups to come out and pick your own fruit. This is a wonderful idea for families or groups with small children as these trees are the family fruit trees and are close their home.
I will keep you posted with times, dates and fees, or you can talk to Kim this week at LFM.

Sunday, July 19, 2009

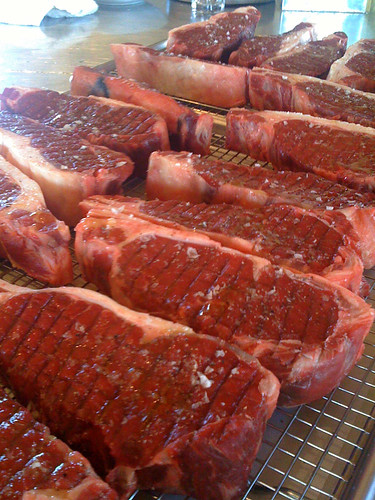
Diamond Tail Dreaming....Bison Steaks

I have been noticeably absent for almost a month. I've missed the Farmer's Market and I've really missed my blog, but....
Once you've seen where I've been, I hope I can be forgiven. I do include a recipe (barely) at the bottom of the post.

Somewhere along the way, I got lucky and I was hired to work for a family who owns a Bison ranch (among many other things).

DSC01140

DSC01122
Nightsong sculpture by Joe Beeler, and a herd of American Bison

IMG_0336
The back porch, which overlooks some of the grasslands the Bison graze on each morning.
I spend a few moments every morning on this porch, just being Thankful!

IMG_0362
The Big Laramie River..a great place for trout fishing!


IMG_0342

Hand Cut Bison Steaks

I am a purest when it comes to really good beef and bison.
*I prefer to dry age my bison/beef myself (should I blog about this?)
*I do not marinate
*Bison is always, always cooked Rare to Med-Rare.
*Coat with a very good quality olive oil, fresh ground black pepper (I also use red peppercorns), and kosher or sea salt.
* Bison should always sit out at room temp for at least 30-45 minutes before grilling.

* My grill is heated on high for at least 30 minutes ( I am looking for 700 plus degrees here), then it is cleaned a second time before I place the steaks on on the rack. When ready to grill, I turn a section of the grill down to medium.

*When ready, sear steaks for for 3-4 minutes, rotate steaks a quarter turn and grill for 3 more minutes (this will give you cross hatching marks). Now, flip steak and place on an unused section of the grill ( I have big grills, so it's easy) and sear for 3-4 minutes, repeat the quarter turn and grill 3 minutes.

* I cook using an internal temp for meat: 120-125 degrees for rare, and 126-130 for Medium rare. Once the meat reaches these temps we remove it from the grill, and place it on a sheet pan and let it REST for 5-10 minutes.

* I usually place a small pat of unsalted butter on each steak while it is resting. Trust me, this little step adds the perfect over-the-top touch and it is worth the extra calories. Bison is naturally low in fat..so, use the butter!

All you will need with this is a great salad, and a really good bottle of wine.

See you at the Market,
Chef Deb


Saturday, July 18, 2009

Grilled Fava Beans

I love Fava Beans!

For those of you who know me, you already know I love pretty much every food, which tends to dilute the phrase above.

So, just for good measure, I'd like to change it up today and say, "These are my favorite!"

DSC01173

Yesterday, Susan (volunteer extraordinaire) and I, visited Tom at Lone Hawk Farms and were given about 10 lbs. of Fava Beans to showcase this week at the LFM.

Fava beans are also referred to as Broad Beans. They have a fibrous outer pod, and an additional opaque cover over each bean. They are used extensively in Mediterranean and Italian cooking, and can be rather labor intensive. If you have a sous chef, then this will not be a problem. However, in the absence of such a helper, children and spouses make a nice stand in. My only word of warning, if your substitute sous chefs find out how great these little green darlings are, your yield will be significantly less.


DSC01175
Today, we will be grilling Fava Beans and presenting them as an appetizer. It's easy, it's unique, and everyone will be responsible for their own peeling.

Grilled Fava Beans

Fava Bean
Olive oil
Sea salt
Fresh ground pepper
Chopped herbs, or your favorite seasoning.

Heat your coals, gas grill or grill pan to medium high heat. Toss fava bean pods with a generous amount of olive oil. Place beans on grill, and turn only when they begin to char slightly. Remove each bean as it begins to color/char on both sides and place them in a large bowl and cover with aluminum foil. We want the beans to steam slightly, for about about 5 minutes. Once beans have steamed, add a generous amount of salt, pepper and herbs.

Note: Be generous with the seasonings, for the actual flavor of this dish does not penetrate the pod. The flavor is transferred to your fingers and the bean is seasoned as you peel and pop these into your mouth. Honestly, you may not even get a chance to sample them, because Chris and Susan will have pry them out of my hands before I sneak off to eat them all myself.
Another Note: We found that most of the grilled OUTER pods were edible! All you have to do after you remove the beans, is place the pod in your mouth and pull the pod through your teeth ( just as you would an artichoke). The only thing left will be the two strings on each side of the pod.

See you at the Market!

Chef Deb

DSC01167

Friday, June 5, 2009

Sauteed Spring Vegetable Orzo salad w/ goat cheese & spiced nuts

(I will post the photo later)

Market Orzo Salad w/ Sautéed Spring Greens, Goat Cheese & Spiced Nuts

2 cups pappardelle orzo, cooked according to directions, cool
2 Tbl olive oil
10 Asparagus spears, washed, peeled, and sliced into 1” pieces
2 cups baby Swiss chard, rinsed well
2 cups Aspen Moon Farms, Ruby Spinach or regular baby spinach
1 clove of garlic, smashed and minced (I grate mine with a microplaner)
1/3 cup spiced nuts, Chopped. (try Spice’s Cosmic Masala Pecans)
1/4 cup Haystack Coat Cheese, crumbled
Kosher Salt
Fresh Ground pepper

Dressing: choose your favorite from Corner Market or:
1 tsp. Dijon mustard
2 Tbl. Red wine vinegar
1/3 cup Extra Virgin Olive Oil
Whisk ingredients together, Salt and pepper to taste.

Put cooked cooled pasta in a large bowl, and pour your dressing over the orzo. Toss and set aside.

Heat a large pan over medium heat. Add olive oil, wait one minute then add asparagus and sauté for 4-5 minutes. Next, add garlic, Swiss chard, and spinach and sauté until the greens begin to wilt. Now add chopped nuts and mix thoroughly.

Pour sautéed vegetables over the orzo and stir until completely combined. Cool slightly. Taste and adjust seasonings, adding salt, pepper, vinegar or more oil if need.

To serve: I place additional ruby spinach on a plate, top with orzo salad, and small crumbles of goat cheese and a few last grounds of fresh pepper. Enjoy!

See you at the Market!

Chef Deb.

P.S. Today is our first official Farmer's Market Dinner.. The kitchen (at least the important part) came together nicely.  I will post before and after shots of all the work we did ourselves!

To My Sous Chef Kate: Your talent, skill, ingenuity and generosity is astounding.  Thank you, Thank you. 

Thursday, June 4, 2009

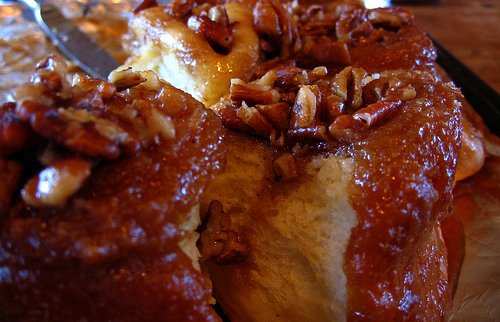
Honey Sticky Buns

Sticky Buns

This may appear to be an over the top boast, but.....

Make these sticky buns and you will have the love and adoration of everyone who eats them. Just be careful and don't let the power go to your head.

Chef's Notes:

* You will need a stand mixer. hand mixers are not powerful enough to make this dough.
* The dough must be made 1 day ahead and proofed in the refrigerator over night.
* The butter must be cool and pliable, not room temperature, not ice cold.

Brioche
Sponge:
3/4 cup. Milk
1 cup  All Purpose flour
4 tsp. Yeast

Dough:
8 oz. Butter, soft and pliable
1/3 cup Sugar
2 tsp. salt
4 ea. Eggs, room temp.
2 ea. Egg Yolks, room temp.
3 cups  All Purpose flour

1. For Sponge – warm milk to 110 degrees and add the yeast. Dissolve yeast completely then add flour, mix until smooth. Cover and let rise until doubled about 15 minutes.

2. For Dough – Add the sponge, eggs and egg yolks, flour, sugar and salt to the bowl. Mix in a stand mixer with the paddle attachment until mixture is smooth and consistent. This will take a few minutes and will look rough initially. Once the sponge is incorporated, switch to a dough hook. Add the soft butter one or two pieces at a time. Dough will be soft and sticky. Once butter is incorporated, mix on low speed for 5 minutes until a smooth dough develops.

3. Place in a clean oiled bowl, wrap and refrigerate overnight.

4. Next day, remove dough from refrigerator, prep your filling and topping.

Filling:
8 oz. Butter, softened
1  cup brown sugar
or filling of choice
Topping:
8 oz. Butter, softened
1 cup Brown sugar
1 1/2 cup Honey
1½ tsp. Ground cinnamon
½ tsp. Salt
2 cups Pecan pieces

1. Cream butter and sugar. Add honey, salt and cinnamon. Mix until combined.
2. Spread over bottom of a 2,  9" greased pan. Sprinkle pecans over caramel filling on bottom of pan.
3. Roll out brioche dough into a 12” x 24” rectangle and spread filling. Do not take the filling all the way to the edges.
4. Roll up dough and cut into 12 equal pieces.
5. Place rolls on top of caramel and nuts in pan.
6. Cover with plastic wrap, proof/let rise until double, about 1 1/2 to 2 hours (just don't put them in a warm place, the dough will turn greasy. 
7. Bake for 20 – 25 minutes in a 375° oven.
8. When done, remove from oven and let rest/cool for 8- 10 minutes. (not any longer or the buns will not release from pan. If the caramel sets, just return the buns to hot oven for 5 minutes) Cover pan with plate and carefully turn pan over.  Enjoy.  
Call me when they're out of the oven, I will bring the milk!

See you at the Market.
Chef Deb


America's Favorite Farmer's Market....

Dear LFM Supporters and Friends,

I am including a post I received from our Market Manager, Cindy Torres:

"The American Farmland Trust is hosting a national competition to find America's Favorite Farmers Market. The Longmont Farmers' Market has doubled in size over the past couple years thanks to our hard working farmers, loyal customers, and supportive local government! Let's show America, our community's dedication to market farmers, great food, and healthy communities by voting for the Longmont Farmers' Market as your Favorite Farmers' Market.

Do you love shopping at the Longmont Farmers Market? Is the Longmont Farmers' Market the best farmers market in the country?

You Bet!

Cast a Vote for your Favorite Farmers' Market: The Longmont Farmers' Market and vote for local farmers, great food, and healthy communities!

http://action.farmland.org/site/PageNavigator/Americas-Favorite-Farmers-Markets/best_local_farmers_market_vote


Thank you!

Cindy Torres
manager-Longmont Farmers' Market
--


A note from Chef Deb:

I am sure many of you have heard me spout this little bit of information, but I think it bares repeating.

We (LFM Shoppers) outspend our neighbors! The average dollar per person, spent at the other market is $5-$6, while the average shopper at LFM spends about $35-$40. Yes, they have more volume, but dollar for dollar, we outspend the other guys. Plus, no one ever calls our market a "mad house".

Personally, I love this market, and I adore the farmers and the people even more. This is a great place visit, a wonderful place to shop, and a community I am proud to call home. I say we just call ourselves the winner's of this little competition and then get back to pondering life's most important questions:

"When will the corn arrive?" " Will $40 be enough market bucks?"

"Is it peach season,yet?" "Where's the donut guy?"

and my personal favorite..."What are you making today"?

Don't forget to vote and ....

then I will see you Saturday, at America' s Favorite Farmer's Market (I am just practicing).

Chef Deb

Monday, June 1, 2009

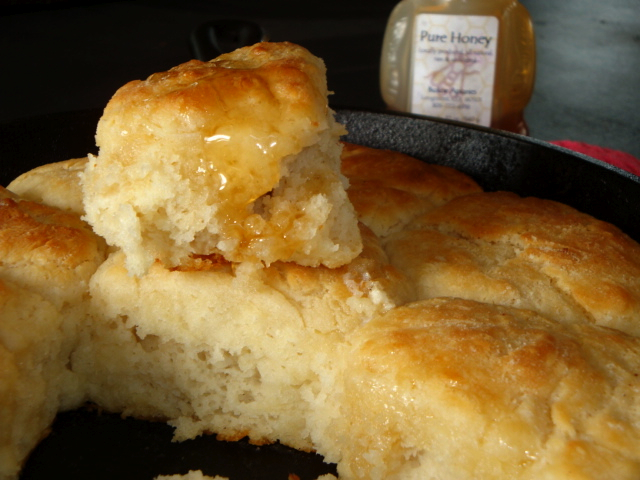
Southern Biscuits w/ Local Honey

DSC01086


My all time favorite biscuit recipe is not from my grandmother or my mom, but rather, from chemist and "BakeWise" author, Shirley O. Corriher.  This woman is brilliant, and her recipes and books are a universal standard in many professional kitchens.   If you have ever watched more then a few episodes of Alton Brown's "Good Eats", chances are you know who I am talking about.  

Somewhere in our collective minds we've bought into the notion that biscuits should have flaky layers AND be light and fluffy.  Maybe.  Personally, I just prefer the "light and fluffy" version. I find when most biscuits are rolled (even with fourteen layers of melted butter) they may have layers, but rarely do they achieve the "fluffy" texture I find satisfying.  HOT fluffy  biscuits are a personal preference and I cannot imagine any other biscuit recipe ever finding it's way into my oven. These are so amazing, they are even good cold.
( Just don't tell me you ate them cold.. this is a friendly blog, and we'll leave politics, religion and any talk of cold biscuits outside this forum. a cold biscuit?  It's too distressing to even think about!)  

I have made small modifications to Mrs. Corriher's recipe.  
*She prefers sweet biscuits.  I prefer to add sweetness with honey or jam and leave most it out of my biscuit dough.
*I also substituted butter for shortening.  
* She recommends using a southern low protein flour called, White Lily.  Unfortunately, we do not have access to it in our region, so I use regular self-rising flour. 
**I make my own buttermilk, however any commercial brand will work fine.

Note: To my southern relatives...is it too strange to ask for White Lily flour for a birthday present??

Southern Biscuits
recipe adapted from "BakeWise", by Shirley O. Corriher

Preheat oven to 425 degrees
Line a small square or round baking pan with parchment paper, or use nonstick spray. 
I prefer a buttered cast iron skillet.

2 cups self-rising flour
1-2 Tbl. Sugar (SC version, 1/4 cup)
1/4 tsp salt
1/4 cup,  very cold, and cut into small pieces
2/3 cup cold heavy cream
1 1/4-1 1/2 cups buttermilk,

1 cup all purpose flour, for shaping
3 Tbl unsalted butter, melted


In a large bowl, combine flour, sugar and salt. Next add very cold butter pieces and toss with the flour. Now use your fingers to quickly smash the butter and flatten each piece, (this should take no more then 2 minutes, as you want the butter to remain ice cold.  Do not use a pastry cutter with this recipe. The traditional instructions for,  'pea size' or 'resembles course meal', butter and flour techniques need to be laid to rest). Toss/stir the flattened butter a few times to evenly distribute.

Add heavy whipping cream and stir a few times, then add 1 1/4 cup buttermilk, adding more if needed. Stir to completely combine.  According to S. Corriher, "THE DOUGH SHOULD RESEMBLE COTTAGE CHEESE". It is suppose to be wet, but not soupy. Dough is ready to shape.

Spread 1 Cup all purpose flour onto a plate or pie pan.  Using a medium ice cream scoop, place 2 to 3 scoops of dough on top of the flour and sprinkle additional flour in top of each. Flour your hands and gently shape your dough into a round, shake off the extra flour and place it onto the prepare pan. Be sure to place the biscuits TIGHTLY together.  Continue until all the dough is used up. 

Bake biscuits until they are lightly brown, about 20-25 minutes. Brush each biscuit with melted butter and use a knife or spatula to cut between biscuits. Serve piping hot with local honey and of course, more butter. Enjoy HOT!

See you at the LF Market!
Chef Deb

DSC01082

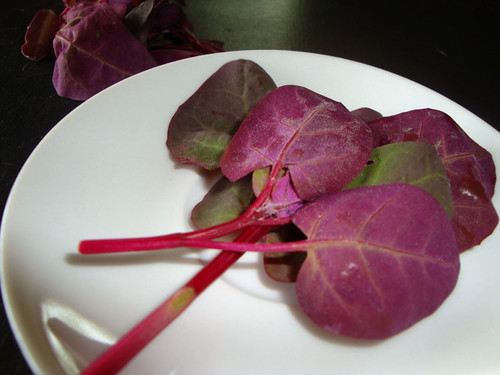
Ruby spinach


Ruby spinach originally uploaded by Chef Deb T.

 I LOVE this!  When the Griffith family at Aspen Moon Farms first brought me a sample of this colorful spinach, I wasn't quite sure what I was looking at. But it only took me two seconds to know, I was holding something very special. This gorgeous spinach is soft and buttery and has  a meaty texture that really is amazing. 
It took another 30 seconds to ask THE important questions....
"Have you shown any OTHER chefs this stuff yet?" 
The answer was, yes.  
Rats!  
"Who?"
Bradford Heap. 
Good.....
"Anyone in Boulder?" ( eyes wide, brows raised)
No. 
Whew!  I am fairly certain I almost knocked them over at this point. My mind was racing with all the dishes I could create with this striking vegetable. But more importantly, only one other chef in Boulder County was using it!  HAPPY, HAPPY, JOY, JOY!  This means you have a few Saturdays at Longmont Farmer's Market to purchase a bag for yourself, BEFORE the BIG chef's in Boulder take it all, and charge you $10 for a side order.
Honestly, I haven't moved beyond serving these little beauties with anything more then a light tossing of oil & vinegar dressing.  I will definitely need  to buy a larger bag this week...
See you at the market!
Chef Deb

Aspen Moon Farms
8020 Hygiene Rd.
Longmont, CO 80503
jgriffith@skybeam.com
 

Saturday, May 30, 2009

LF Market Mac & Cheese

 Pappardelle's Spicy Southwest Pasta w/Haystack's Buttercup Cheese 

DSC01061

Every Saturday my goal is always the same. Bring enough food to prepare as samples and not run out until 11:35.   It's a good thing I'm not upset with constant failure, as I have never been able to reach this goal.  Never.  

Yes, the Market runs from 7:30 a.m.- 2:00 p.m., every Saturday, and I usually  arrive around 8:30.  Yes, I HAVE been doubling, tripling and even quadrupling the volume of food I bring to sample out each week. 

This Saturday, I didn't  even make it out of the culinary gate, as we were completely wiped out by 10:30 a.m.!  Part of me wants to believe MY powers of persuasion and my ability as a "food pusher" are so strong, it' just inevitable.  Silly me.

I overlooked one major point.  The only words in the English language with more power to attract a crowd then, "free samples",  has to be, " free samples of Mac & Cheese"!

This weeks' recipe used two LF Market favorites: Pappardelle's Spicy Southwest Pasta and Haystacks Buttercup goat and cow's milk cheese.


Pappardelle's Spicy Southwest Pasta w/Haystack's Buttercup Cheese

1 Lb  Southwest Pasta 

4 Tbl unsalted butter
4 Tbl all purpose flour
1 Tbl Dijon mustard
1/2 cup heavy cream
1 1/2-2 cups milk
6-8 ounces, Haystack Buttercup goat and cow's milk cheese, grated.
Kosher Salt
fresh Ground pepper

Boil pasta according to Pappardelle's directions, until al dente. Reserve 1/4 cup of pasta liquid. Drain pasta, and rinse with cool water. Note:
  • When salting pasta water, use 2-3 tablespoons of Kosher salt to one gallon of water.  A "pinch" of salt is simply inadequate and does nothing to flavor your pasta. Salting the water enhances flavor and allows for "salted" pasta rather then "salty" pasta.  Trust me, there is a difference.
  • Do not add oil to pasta water or to finished pasta, as it will keep the sauce from adhering and it creates a greasy curdled effect with finished dish.

Sauce: Heat butter in a 4 quart sauce pan over medium heat, whisk in flour, then add mustard. Next, add cream and whisk until all the liquid is absorbed and there are no lumps, then slowly add 1 1/2 cups milk, and bring mixture to a low simmer.  Sprinkle in goat cheese a little at a time, stirring between each addition (this prevents cheese from clumping together in a big mass). Continue to simmer until all the cheese is melted. Use additional milk if sauce becomes too thick.  

To serve: 
Return pasta, with 1/4 cup pasta water, to the pot and heat quickly.  Pour hot cheese sauce over pasta, and add salt and pepper to taste. Serve immediately. Enjoy!


Thanks for coming to the market, and I will see you next week.

Chef Deb

Wednesday, May 20, 2009

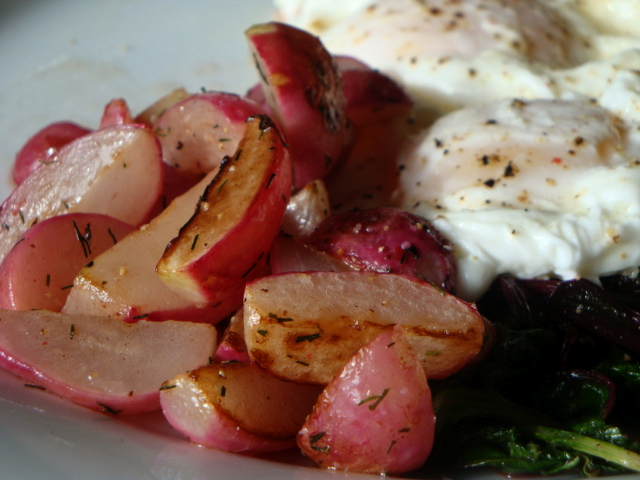
Sauteed Radishes: 2 ways

DSC01037

Yes, you can cook radishes! Judging by the reactions I received at the market, this was a huge hit. Not bad considering it was being served right next to the Rhubarb Floats.  

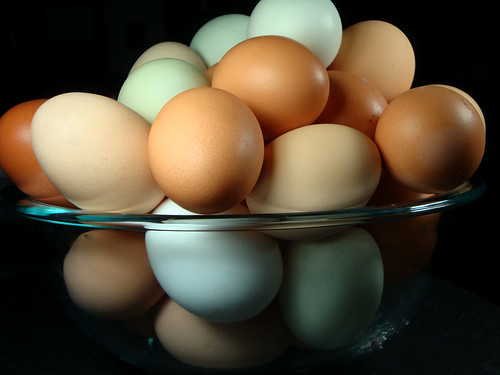
Luckily, I was able to get my hands on a few more small radish bundles at the end of the day, along with fresh Eggs from Wisdom's Natural  Poultry, and baby braising greens from Aspen Moon Farms.

For this photo, I quickly prepared them for Breakfast!  Two quick shots, and many nibbles later, I have to say, this is my new favorite way to serve and eat the humble radish.  

On a Side note: To the Market Shopper who said " you make the strangest food, but it's all been really good, so I am willing to try this too.."  Thank you, I think.

Sautéed in Butter (hot
)
2 Bunches Fresh Radishes, washed and cut into quarters
2 Tbl unsalted butter
1 tsp Fresh herb (dill, thyme, cilantro, etc)
Kosher or Sea Salt & fresh pepper

Heat a medium sauté pan over medium-high heat, add butter and melt. When butter begins to bubble add radishes and sauté for 3-4 minutes. Radishes will begin to color but will remain slightly crisp. Season with fresh herbs, salt and pepper. Serve.

Sautéed in Olive Oil w/Balsamic Vinegar (cold)

2 Bunches Fresh Radishes, cleaned and quartered
2 Tbl. E. V. Olive oil
1 tsp fresh herbs
Kosher or sea salt and fresh pepper
Balsamic Vinegar

Heat a medium sauté pan over medium-high heat; add olive oil and heat for 1 minute. Add radishes and sauté for 3-4 minutes. Radishes will begin to color but will remain slightly crisp. Remove pan from heat and allow vegetables to cool. Once cool sprinkle with fresh herbs, salt and pepper and drizzle with balsamic vinegar and additional olive oil. Serve at room temp.

See you at the Market.....
Chef Deb 
Tuesday, May 19, 2009

Springtime Rhubarb Floats

DSC01016

Well, it's rhubarb season, and the last few days have been HOT. Quite frankly, I have no intention of turning on my oven, at all. It seems I am also not up for my usual babbling banter. The way I see it, the quicker I make the floats and take the photo, the quicker I get to sit on the back deck and enjoy a little bit of Spring, even if it's only in a glass.

I will sample these at the Market this weekend!

Springtime Rhubarb Floats

4 Cups Rhubarb, cleaned and chopped
2-3 cups sugar
1/2 water

Local, Glacier Homemade Ice Cream or Gelato: Vanilla, strawberry, or lemon
Club Soda

Place Rhubarb, sugar and water in a 4 quart stock pot w/ a lid, over medium high heat. Cook mixture for 15 minutes or until the Rhubarb begins to break down. Taste mixture and adjust with more sugar if it is still too tart or add a squeeze of lemon, if mixture is too sweet. Strain the solids from the syrup. ( I keep the Rhubarb pulp and put it on french toast, or add it to strawberry pies). If you want a thicker syrup, place the liquid back on the heat and reduce for 5 more minutes.

To serve: Pour a few tablespoons of Rhubarb syrup in the bottom of your cold glass then add a nice big scoop of Glacier Vanilla Gelato, then Club Soda, and then additional Rhubarb syrup. Enjoy!

** After MANY taste tests, it seems the house "Cheflettes" think this makes a really nice sparkling drink: Rhubarb Syrup, Cold Sparkling Water, and tons of ice.
** If you have any left, it is also great on French Toast

See you at the Market!

Chef Deb
DSC01018

Saturday, May 16, 2009

Villa Bozza's Gluten Free Potato Gnocchi w/ Sauteed Spinach

This is a repost from last year.. It just reappeared and I don't have the foggiest notion as to "why". Our farmer's do have tons of spinach. However, I don't believe this particular vendor is at our markets this year. Enjoy the repost!


DSC01015

This was a huge hit at LFM this Saturday! The gnocchi was light, with a wonderful texture, and had many market shoppers making a straight line to the Bozza pasta stand! Thank you Bozza for donating all the gnocchi this week. There was a moment, where we thought we would just take the pan and eat it all ourselves. These were THAT good!

You can find Bozza Gluten Free Gnocchi at the Longmont Farmer's Market on Saturdays all summer long. Stop by, buy some pasta and see all the other wonderful food your local farmers and producers have to offer.

Gluten Free Gnocchi Potato w/ Sauteed Spinach

1 LB. Fresh Frozen Gnocchi Potato

2 LBS. Farm Fresh Spinach, washed, stemmed and chopped
1 Bunch Green Garlic
3 TBL. Extra Virgin Olive Oil
1/2 to 1 Tsp. Red pepper flakes
1/4 cup grated or crumbled local goat cheese, or Parmesan
Salt and Fresh Ground Pepper to taste
Lemon juice (optional)

Place Villa Bozza Gluten Free Potato Gnocchi in 4 quarts salted boiling water (w/ 1 TBL kosher salt). Wait 15 seconds and stir gently. When water returns to a boil, cook the Gnocchi for 4-6 minutes. Drain (reserve 1/4 cup of cooking liquid) and serve with your favorite sauce or sautéed local greens.

Heat a large sauté pan in medium heat, add extra virgin olive oil, wait 30 seconds then add green garlic and sauté for 2 minutes,, then add red pepper flakes, stir for 30 seconds. Next, lower heat and add spinach, cover pan with a lid for 3 minutes, remove the lid and sir. Now add, pasta, a few tablespoons of cooking liquid, a few grinds of fresh pepper, some cheese, taste, adjust seasoning and add a teaspoon of fresh lemon juice to brighten the flavor if need. Enjoy.

See you next week at the Market.

Chef Deb
Thursday, May 14, 2009

Chocolate Sauerkraut Cake w/ Dark Chocolate Glaze

DSC01003

Yes, Sauerkraut, IN a chocolate cake.  It's time to think outside the box a little on this one....

So why mess with a chocolate cake? And why, oh why would I use sauerkraut?

Well, I have several reasons......

Historically speaking, cooks have always used unusual ingredients in a variety of common foods. Does anyone remember hearing their parents talk about putting mayonnaise or a can of tomato soup in chocolate cakes?  A Pillsbury cook-off contestant once won a million dollars for putting pureed pears in his "tunnel of Fudge cake". It's not such a big leap from pears to sauerkraut......I swear!  

Both ingredients serve a purpose. Pears add sweetness, moisture, and structure to the cake. Sauerkraut adds moisture, structure and it also reacts to the baking soda and aids in leavening.  

Other good reasons to try this cake, either at home or at Longmont Farmer's Market this weekend ? The first, this is a moist rich tasting cake and if you are a chocolate lover, you may be surprised.  Second, sauerkraut is a good source of fiber, high in magnesium and vitamin K, and it is mildly anti-inflammatory. 
Finally,  besides it being a novel idea for a cake and may send  your office mates into a mild state of disbelief...it's just another way to support our local market.  

Many of you know Andy Jesik as the, "pickle or sauerkraut" guy, and you may only visit the Mountain Valley Canning  stand in the summer when  you want to put a few brats on the grill. That's Great!  Thank you, they love the support. But here is the recipe to use when you still have a small bit of sauerkraut left over and have no idea how you will use it up! 

Chocolate Sauerkraut Cake w/ Dark Chocolate Glaze

1 cup unsalted butter
2 cups sugar
3 large eggs
2 teaspoon vanilla extract
1/2 cup unsweetened cocoa *(I like to add one additional 1 Tbl of Black Onyx Cocoa, for a darker cake)
2  cups all purpose flour
1 teaspoon baking powder
1 teaspoon baking soda
1/4 teaspoon salt
1 cup milk, water or strong coffee (coffee will intensify the chocolate flavor)
2/3 cup sauerkraut, rinsed**, drained and chopped finely (I chop mine in a mini processor)

Preheat oven to 350 degrees F (175 degrees C). Grease and flour one Bundt pan.

Cream butter and sugar together until light and fluffy. Beat in eggs one at a time, and then vanilla, blending well.

Combine dry ingredients and add alternately with water/milk/coffee to creamed mixture. Stir in sauerkraut.

Pour batter into prepared bundt pan. Bake for 40-45 minutes or until wooden pick inserted in center comes out clean. Cool in pan 10 minutes on wire rack before removing cake. Cool completely. Glaze.
*Black Onyx Cocoa can be purchased from Savory Spice Shop in Boulder on Broadway.
**Try soaking Sauerkraut for 5 minutes in water to remove some of the flavor. 

Dark Chocolate Glaze

3/4 cup dark Chocolate (60%): You can use semi-sweet or your favorite chocolate chip
1/2 cup Heavy Cream
1/4 cup unsalted butter

Heat cream and butter in a small sauce pan to almost boiling, remove pan from heat and add chocolate. Let rest for 3 minutes, then stir to fully incorporate. Pour glaze over cake, while chocolate is still warm.


See you at the Market,

DSC01002  Chef Deb

     We have more spots available for the LFM Market Tours & Dinner
        Date:May 30, 2009,  Time: 1:30-5:30,    Fee: $45  (2 spots available)
        Date: June 6, 2009    Time: 1:30-5:30     Fee: $45

Saturday, May 9, 2009

Sauteed Asparagus Coins w/Green Garlic

Asparagus season..... 
Please consider taking a look at our local asparagus.
DSC00984

I know, I know.

You can buy asparagus at the grocery store for a fraction of the price and it's all bundled in cute little bunches. But consider this: Once asparagus is picked, it quickly begins to loss important nutrients.

How long did it take the cheaper asparagus to get to your store?
How long has it been in the grocery cooler? How long will you let it sit in your refrigerator before you decide to cook it? How much of the vegetable will you cut off because it has gone bad, limp, or is just too tough? Where IS the bargain when you really are not that excited about your "cheaper" store purchase, and you have to throw so much of it out?

There is something very special about purchasing asparagus from our local farmers.  You KNOW they were out late the evening before the market, harvesting at the VERY last moment, to ensure you have a product at the very peak of its flavor. When you see them standing proudly behind those gorgeous bundles of dirt covered stalks....please remember, that it's local soil my friends, and buying local keeps those sad road weary California asparagus out of our landfill.

Local Asparagus season is roughly 10 weeks, that's it.  We've already said goodbye to two...  I'll see you next week...

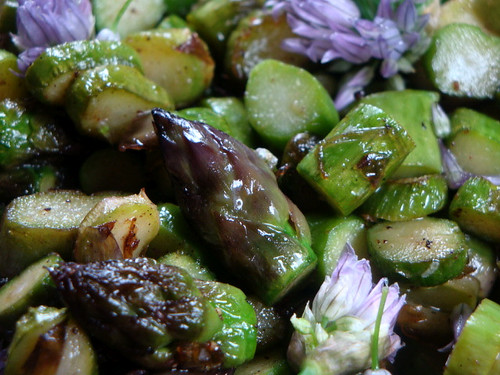
This photo is of Sauteed Asparagus coins w/ Chive blossoms, we ran out of green garlic.
DSC00997

Sauteed Asparagus w/Green Garlic

Asparagus, washed, bottoms trimmed, and the bottom 1/3 peeled, if the bottom is tough
Olive oil, or butter
Green Garlic, whites and light green parts sliced.
Salt and pepper

Slice asparagus into 1/2 inch thick slices, leave the tip intact.  Heat a saute pan on medium heat, add oil/butter and wait for 2 minutes,  then add green garlic.  Saute for 2 minutes, then add asparagus and continue to saute for 5-6 minutes. Season with salt and pepper.  Serve immediately.

Enjoy,

See you at the market!

Chef Deb 
Friday, May 8, 2009

Roasted Sunchokes

Longmont Farmer's Market: May 9, 2009  
Time: very early- 2:00p rain or shine!

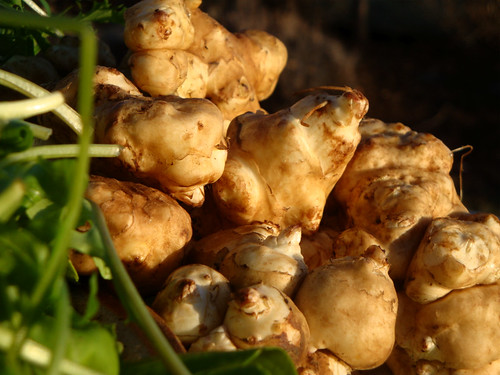
Sunchokes (a.k.a. Jerusalem artichokes)  These are odd little guys...They are North Americas oldest tuber. They look like a cross between ginger and a potato, but they have a sweet, nutty flavor.

As defined by, The Food Lover's Companion:  "This vegetable is not truly an artichoke but a variety of sunflower with a lumpy, brown-skinned tuber that often resembles a gingerroot. Contrary to what the name implies, this vegetable has nothing to do with Jerusalem but is derived instead from the Italian word for sunflower, girasole. Because of its confusing moniker, modern-day growers have begun to call Jerusalem artichokes sunchokes, which is how they're often labeled in the produce section of many markets. The white flesh of this vegetable is nutty, sweet and crunchy. Store in a plastic bag in the refrigerator for up to a week. After that, they will begin to wither because of moisture loss. They may be peeled or, because the skin is very thin and quite nutritious, simply washed well before being used. Jerusalem artichokes can be eaten raw in salads or cooked by boiling or steaming and served as a side dish. They also make a delicious soup. Jerusalem artichokes are a good source of iron."

More useful facts: The plant stores inulin (not insulin) as starch for extra energy during winter months in its tubers. What makes the sunchoke useful, for diabetics in particular, is that the inulin it contains breaks down into fructose instead of glucose during digestion. For diabetics, this makes the sunchoke a good substitute for other starchy foods such as potatoes.
 

DSC00907


Here is a quick recipe:

Roasted Sunchokes

1-2 lbs sunchokes, scrubbed, cut into uniform chunks
2 Tbl olive oil
Fresh herbs ( Thyme, Rosemary. Sage, etc.)
Green garlic, Chopped
Sea Salt
Fresh ground pepper

Oven: 375 Degree F.

Toss Sunchoke w/ olive oil, salt and pepper and place on a parchment lined sheet pan in the middle of the oven. Roast for 20 minutes. Add Fresh herbs and green garlic to sunchokes and stir, return pan to oven, and continue to roast until chokes are golden and the green garlic is tender. Season with additional salt and pepper.
Enjoy!

See you at the Market.

Chef Deb 
**P.S. Meet us in Longmont for our first, Farmer's Market Tour & Dinner!! 

May 30, 2009 @ 1:30-5:00 ish  
Fee: $45 per guest
Register at LFM this weekend!

Includes:
 Chef Guided market tour, food, cooking class, dinner, recipes and a whole lot of fun!


Sunday, May 3, 2009

Soft Scrambled Eggs w/Spinach Arugula Pesto & Sauteed Mushrooms

DSC00969


I have dreams of creamy scrambled eggs made with fresh farm eggs. In fact, I love eggs cooked in every conceivable manner: boiled, basted, sunny side up, over easy, poached, and the perfect omelette.  

Gordon Ramsey has a great video demonstrating, what I consider to be, the perfect scrambled egg recipe. While his kitchen persona is rather brutish, his scrambled eggs more then make up for it. If you have a moment, please click here 

While your at it, here is an example of the perfect omelette...notice, no color on his omelette! Except for Julia Child's video, 95% of all omelette demonstrations are done improperly, leaving the eggs overcooked, crusty and tough. But this is just my opinion....

Local eggs from the Olin Farm's stand on 95th.
DSC00960

The premise of this recipe is to reduce the cooking surface area of the eggs, so use a small pot with tall sides rather then a fry pan.  You will also begin with a cold pan, and the butter is IN the eggs and not ON the pan.

Soft Scrambled Eggs w/Spinach Arugula Pesto & Hazel Dell Mushrooms
serves 2

6 eggs
2 Tbl unsalted butter, cut into pieces
salt and pepper
1 tsp. creme fraiche, cream, soft goat cheese, or cream cheese

Break your eggs and put them in your  pot (you can use a nonstick pot if you want), add your butter pieces, then put the pot over high heat and stir. As they begin to cook remove the eggs from the heat, stir for 30 seconds, the return to heat. Repeat.  When the eggs begin to set, add cream or goat cheese, and season with salt and pepper.


Mushrooms, wiped clean
Olive oil
Salt and pepper
Fresh Thyme

Heat a skillet over high heat, add olive oil and mushrooms. Sear for 3-4 minutes, season with salt and pepper and a pinch of fresh thyme.

Spinach Arugula Pesto

2 cups boiling water
1 cup Spinach
1 cup Arugula
2-3 Tbl olive oil
3 Tbl Parmesan or bread crumbs, or pecan/walnuts or pine nuts
Salt and pepper 

Place greens in a bowl and pour boiling water over them ( I just skip the bowl and place them in my blender). Let stand for 3-4 minutes, drain well. Add the rest of the ingredients and blend until smooth.  Taste and adjust seasonings. 

To serve: Place toast on plates, drizzle with olive oil or pesto, top with eggs, mushrooms and additional pesto if desired. Season with salt and pepper (yes, again...). Serve immediately.

Enjoy.

See you at the Market!

Chef Deb 
Note: Saturday Market Demo: 
*Soft Scrambled Eggs w/ Spinach Arugula Pesto and Mushrooms
*Sauteed spring Asparagus coins w/green garlic  (recipe will be posted by Wednesday)

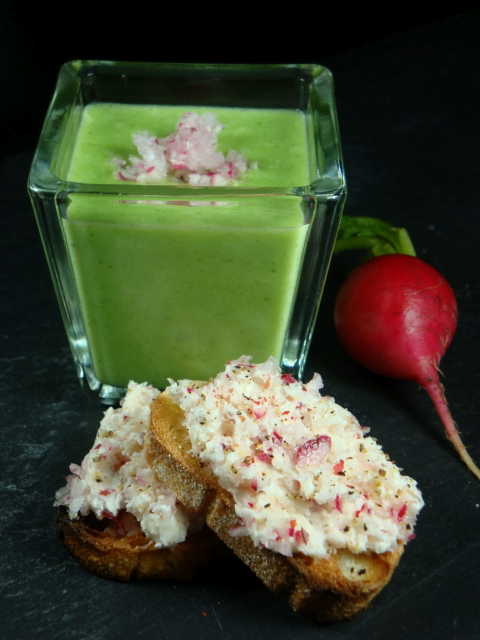
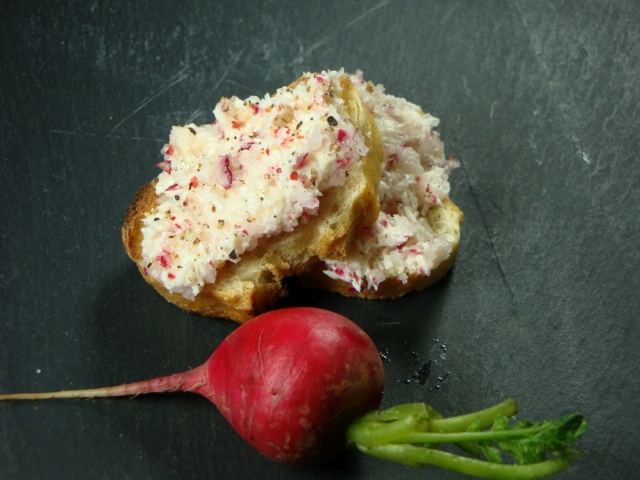
Radish Greens Soup w/Salted Radish Butter Crostini

Longmont Farmer's Market Begins May 2, 2009


DSC00953

Rain or shine, we will be there!

Update 5-03-2009:  It DID rain, and it was c-o-l-d! Thanks to all the die hard Longmont Market shoppers/groupies who showed up anyway!! A very humble thanks to Susan and Chris for volunteering this week. I would not have been able to keep up without your help.  I promise to feed you better next week...you are coming back next week...right? 

For quite some time, I have been contemplating my first two recipes of the season. Should I make:

*Braised beef (or pork, although not technically at our market this year..Long Family Farms IS still local)
*Soft scrambled eggs w/herbs and goat cheese
*Braised beans w/spring greens
*Parsnip puree w/ green garlic
*Arugula pesto w/ local pasta
*Hazel Dell mushrooms: 2 ways.. Sauteed w/ garlic, butter and sherry & a cold mushroom relish

However, in the event of rain, I always turn to soup. This Saturday, I will offer something a little different using: Spring Radishes.  The radish is a humble item often ignored on most Crudité platters. But I want to introduce you to a bright and vibrant, radish greens soup paired with the gorgeous blush of fresh radish butter and salt on toasted baguettes. I love these recipes for their flavor, color and most importantly because it is inexpensive and so unexpected. It's going to be a hard sell this time, but I am up for the challenge! 

This WAS a hard sell, but as soon as I convinced ONE brave soul to taste it, (and the Guinea pig did not die or make faces), I was on my way.  We actually sold out of Radishes this week! 

I hope you will give one or both of these recipes a try. Better yet, stop by the Longmont Farmer's Market this Saturday and I will make it for you!  Please note...I generally do not arrive at the Market until 8:30 ish.   I am not as punctual as our farmers.  

Market Radish Green Soup w/ Radish butter Crostini

2 Tbl. Olive oil
1 large onion, diced
2 medium potatoes, diced
4 cups raw radish greens (about 2-3 bunches)
6 cups water, vegetable or chicken broth
1/3-cup heavy cream (it's still good without it)
5 radishes, grated
Salt and pepper
Lemon juice (optional)
DIRECTIONS: Heat olive oil in a 4-quart soup pot over medium heat. Stir in the onion, and sautÈ for 4-5 minutes. Next, add potatoes, water/stock and simmer for 10 minutes or until the potatoes are tender. Add Radish greens and cook for 5 more minutes,
Allow the soup mixture to cool slightly, and transfer to a blender. Blend until smooth. Return the mixture to the saucepan over low heat. Stir in the heavy cream, season with salt and pepper and a squeeze of lemon juice.
 
Serve with grated radish or Radish Butter & Salt Crostini!

DSC00955
Radish Butter & Salt Crostini 

6-8 Radishes, chopped
1/2 cup cold unsalted butter, chopped
1 tsp. Fluer de Sel (or Kosher salt)
Fresh ground pepper

Combine: radish and butter with 1/2 teaspoon of salt and pepper.
To serve: Spread radish butter over toasted baguette slices and sprinkle with additional salt
**Or for vibrant pink color combine radish, butter and 1/2 teaspoon salt in a food processor and mix briefly. **

Enjoy.  See you at the Market!

Chef Deb 

*Longmont Farmer's Market Tours and Dinner*  May 30 @ 1:30 to 4:30 $45 
*Boulder Farmer's Market Tours and Dinner * coming soon!

Sunday, April 12, 2009

Longmont Farmer's Market: Green Garlic and Mizuna Soup

Market Groupie.....a not so subtle obsession, and ....

Green Garlic and Mizuna Soup
DSC00920

Mention The Farmer's Market, any Farmer's Market, and my pulse quickens and my adrenaline goes into overdrive! I am sure, in the right situation, I would even jump up and down and cry tears of joy ( I won't, I have teenage daughter's and that would be too embarrassing!). 

I am completely enamored with our local farmers.. ..and I am willing to bet it can be a bit annoying to have someone like me show up each week, fawning over every fruit, vegetable and product, the way I do. 

Yes, I am an unabashed, unapologetic, over-the-top, Market Groupie! The funny thing is, I am like this every time I visit a farm, farm stand or the markets on Saturday. I am patiently waiting for the "Farm Network" shows (it could happen..)...I'd be willing to cast aside celebrity chefs for rock star farmers any day!

I genuinely hope, as my life in food continues, that the simple act of buying local fresh produce never becomes pedestrian. My friends, we may not be in sunny California, but this little part of the world has some honest to goodness, drop-to-your-knees-and-be-thankful, amazing locally grown produce! 

*********

Saturday, April 11th, was my first official visit to the Boulder Farmers Market. As soon as I arrived, I was fortunate enough to speak with BFM Executive Director, Mark Menagh who, within 60 seconds of our meeting, gave me the best bit of "Insider information", if you will. While I wanted to spend time strolling through the market, I was given a quick rundown of the days special selections and the vendors offering them with the added, 'you'd better hurry, their running out". 

My eyes widen at the thought... Gasp! No! 

I MUST  h-h-u-u-r-r-r-r-r-y-y!

I crawled, jumped, weaved and purposely plowed my way through large masses of Saturday strolling/coffee drinking/dog walking/ "Hey! How's your life been? and do give me the War & Peace version" of Market shoppers!

"COME ON!" I was saying, not so quietly. "Don't you REALIZE, they are running out??!!"

 Running out!!

 IF I had been John Elway trying to force my way to a touchdown, I am sure fans would still be talking about my moves. Instead, everyone was just fairly annoyed.

But I didn't care.

They WERE running out.   

No one gets between a Market Groupie and the last handful of seasonally limited and quickly dwindling green garlic and sunchokes.  

No one.  

ahem....Please, accept my apologies if ran over your visiting aunt or grandma last Saturday. I know, I should be ashamed...but, they WERE running out.  

Green Garlic and Mizuna Soup

1-2 bunches green garlic, washed very well, trimmed and chopped, use all
1 small white onion, chopped
2 Tablespoons butter, or olive oil
6 cups water, or vegetable stock
1 bay leaf
2 stems thyme
3-4 cups Mizuna (spinach, arugula, etc.)
1 lemon zest and juice (optional), or 2 Tbl sherry
1/2 cup cream
Salt and pepper to taste


Heat a 4 quart soup pot over medium-low heat, add butter/olive oil, green garlic and onion and gently sweat (cooking with out coloring or caramelizing) until the onions are soft and translucent. Next bring heat up to medium-high,  add water, bay leaf and thyme; simmer for 10 minutes. Add Mizuna, cook for 2-minutes. Remove from heat and take out bay leaf and thyme stems.

Puree soup in small batches. Be careful, soup is still hot!

Return soup to pot on low heat, stir in cream, salt, pepper and heat through.  

To adjust seasonings: add sherry or a few drops of lemon juice and a bit of zest and more salt. 

Enjoy!

See you at the Market!  (LFM Begins May 2!!)
Chef Deb
Friday, April 3, 2009

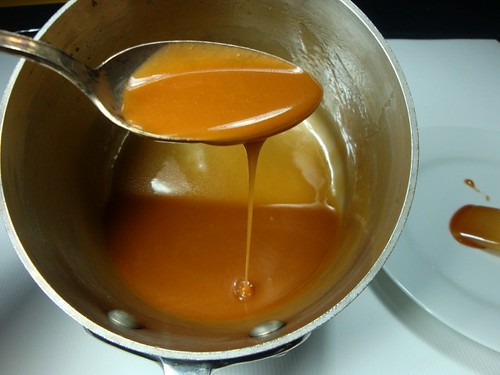
Agave Nectar Caramel Sauce

Personally, I am a big fan of Agave Nectar. I use it to sweeten cold drinks and fruit sauces without the worry of having to dissolve it first.  

 Agave nectar is harvested in Mexico from the Agave plant (the same plant used in making Tequila), and  some of it is processed and bottled in Lyons, Colorado.  Many people love it, and others think it's hype.  I'm just here to show you how to use it.


DSC00824
Simple Caramel Sauce


DSC00839
Fresh Yogurt with Caramel......

Agave Nectar Caramel Sauce

1 1/2 cup agave nectar
1/2 cup Longmont Dairy heavy whipping cream
2 tablespoons butter
pinch of sea salt

Place all ingredients in a medium saucepan over medium-high heat. Cook for 10 minutes or until the mixture begins to thicken. Be sure to stir the caramel sauce occasionally.  If your sauce is too thin continue cooking several more minutes.  If sauce become too thick, add a spot more cream, and bring back to a boil until cream is incorporated.   

Caramel will last approximately a week in the fridge if no one sees it...

See you at the Market.

Chef Deb

Wednesday, April 1, 2009

Spicy Red Pepper Jelly

You know how exciting it is to find a $20 in the pocket of your ski jacket at the beginning of winter? Well, that's how I felt when I found two small jars of this gorgeous jelly in the back of my pantry. I love this stuff on just about everything! I thought I would share this recipe now, so you can have it this summer when our peppers begin to arrive in the market.


Spicy Red Pepper Jell

3/4 pound red bell pepper
2-3 red fresno peppers, or jalapenos
3 cups sugar
3/4 cup cider vinegar
1 pinch kosher salt
4 ounces liquid pectin

Cut the bell peppers into 1-inch piece, and in a food processor chop them very fine. Transfer the chopped peppers to a 4 quart pot, add the sugar, the vinegar, and salt, and bring the mixture to a boil, stirring until the sugar is dissolved. Stir in the pectin and boil the mixture over moderately high heat, stirring, until it reaches the jelly stage (222°F. on a candy thermometer) (this will be hard at our altitude, so cook until the mixture reaches at least 205, it will be thin, but it will be fine.)

Transfer the jelly to sterilizes Mason-type jars. You can process your jelly in a hot water bath if you plan on storing it. If not, it can be stored in the refrigerator for 6 months.

See you at the Market.

Chef Deb

Sunday, March 29, 2009

White Chocolate Cointreau Mousse

White Chocolate Mousse

DSC00882

For the past 5 Saturdays,  I have had the opportunity to be the pastry instructor to a group of wonderful women.  The photo above is from one of the recipes in our class, and I have to say the mousse was done perfectly and it looks wonderful against the strip of rich Berry Coulis.  Ladies, if you ever read this, you surpassed all my expectations and produced fabulously flavorful and beautiful pastries!  Bravo! 


White Chocolate Cointreau Mousse

Makes about a quart

1/2 cup heavy cream

1 ½ cups white chocolate, chopped

4 Tbl Cointraeu

1 Tbs. orange zest

2 cups heavy cream


Method:

1. In a small sauce pan, bring the ½ cup of cream just to a boil. Remove from the heat.

2. Pour over the chocolate, cover, and let sit for 2-3 minutes.

3. Whisk until smooth. Let the ganache cool to room temperature.

4. Combine the Cointraeu, orange zest and ganache. Set aside.

5. Whip the remaining cream to medium peaks.

6. Sacrifice some of the whipped cream into the ganache.

7. Fold in the remaining whipped cream.

DSC00879

Here is the photo of the complete plate; 

White Chocolate Mousse
Raspberry Coulis
Almond Tuile Cookie
Dark Chocolate Mousse w/whipped cream, and a raspberry
Chocolate Ganache Truffle

Enjoy!

Chef Deb

Update:  Longmont Farmer's Market begins:  May 2, 2009.  LFM Recipes will begin soon

***I will be doing  Wednesday Boulder Farmer's Market Tours & Dinner: 
                    Beginning Wednesday May 20, 2009 $45 per person 5:30-8:30

Sign up for Wednesday Farmer's Market Tour & Dinner: Take a cooks tour of BFM with Chef Deb.
We meet at the BF Market:
  •  talk to the farmers and producers,
  •  taste, touch, and smell only the freshest local ingredients 
  •  Help the chef choose the evenings dinner selections
  • head back to The Cook's Studio on Arapaho Rd
  • Cook our market selections as a group with your own private chef to answer questions, and to help with techniques.
  • Enjoy a relaxed meal,  and savor your own Farm to Table dinner.
  • Let us do all the cleaning
  • Sign up for your next Wednesday Farmer's Market Tour!
Longmont Farmers Market Tours & Dinner coming soon!

See you at the Market!

Chef Deb