Tuesday, September 14, 2010

Roasted “Bohemienne” w/ Spaghetti Squash

This is a repost!  The recipe was such a hit at one years farmer's market, EVERY farm stand sold out of all the ingredients... so, I offer it again for those of you who are new or who may have forgotten to give it a try.


DSC01330


I am a reformed squashophobe. There, I said it. I've worked long and hard to overcome my aversion to all things 'squash'. Even the word sounds unappealing doesn't it? Say, "squash". Now, say "cake". Which word makes you happy?
As a child, I was not a big fan of any variety of squash, especially if my mom had anything to do with it. In our house, squash had to be cooked until it no longer held its form, there was no texture to speak of, and one never really knew what the original flavor had been. The only word that comes to mind is: slimy (and blechk!!). To this day, the very thought of my mom's calabacitas still brings on an involuntary shiver. The avoidance of squash is the number three reason I became the family cook.....
Today, I can say I have a better respect for this summer and fall vegetable and I have grown to, (ahem), love it. But I have to confess, each time I am faced with a squash recipe, I approach it the way someone would, when they are jumping off a 10 meter platform into a pool. I have to psych myself up for it and then I am completely surprised I lived through the experience.
Last year at this time, I offered a double squash recipe to LFM shoppers and the farmer's sold out of the ingredients. I was blown away by your reactions to this dish and I thought I would post it again this year. Clearly, my mom never cooked for you or this would have been a much harder sell.
A little history: Bohemienne is the poor southern cousin to Ratatouille. It's simple in composition and easier to make (and less slimy). It consists of: eggplant, tomatoes, onion, garlic, basil, thyme. That's it. Hands down, I prefer this recipe to ratatouille. It makes a really rich vegetarian sauce that can be used in a dozen applications: on pasta, as a topping for Bruschetta, or as a side dish with fish or poultry.
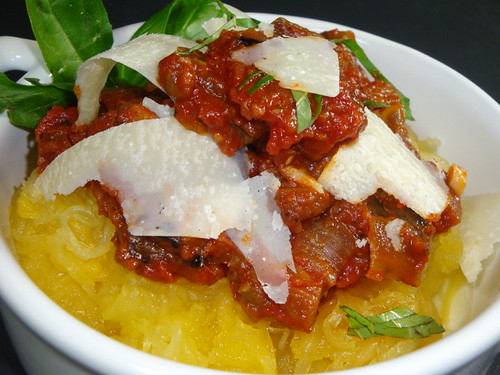
Today, I used it as a topping for roasted spaghetti squash and finished it with some nice thin slices of Parmigiano-Reggiano.

Roasted Bohemienne w/ Spaghetti Squash
Serves 4
  • 2 small- medium eggplants cut into 1/2-inch dice
  • 6 small- medium ripe tomatoes
  • 4 Tbl Extra Virgin Olive oil
  • 1 medium red or yellow onion, cut to 1/2-inch dice
  • 2 cloves garlic, minced
  • 4 sprigs fresh thyme
  • 1 fresh bay leaf
  • 2 stems fresh basil leaves gently torn.
  • Kosher salt and fresh ground pepper to taste
  • 1 large spaghetti squash cut in half and seeds removed
  • Fresh butter or additional Olive oil
  • 2 oz. shaved Parmigiano-Reggiano
Preheat your oven to 375° AND Put a 4-quart pot of water on to boil.
Bohemienne: If using smaller eggplants or ones from you local Farmer's Market, there is no need to salt your vegetable. If the eggplant is large and the seeds are dark (it's older and not as fresh), lightly salt the pieces and allow to rest for 15- 20 minutes, rinse, dry and begin the recipe.
With a paring knife, remove the core of each tomato, and make a 1-inch “x” on the bottom of each. Gently place the tomatoes into the pot of boiling water for 1 minute. Remove and place them in bowl with ice water. Beginning at the “x”, remove and discard the skins from the tomatoes. Cut the tomatoes into quarters, and squeeze out the seeds. Chop the tomatoes into 1/2 chunks, and set aside. ( you may substitute a large can of GOOD Italian tomatoes.)
Using an oven safe casserole pan, heat on stovetop to a medium temperature, add oil, then onions and cook for 5-6 minutes.
Next add eggplant, and cook for 10 minutes. Add garlic, thyme, and bay leaf. Cook for 2 additional minutes and then add chopped tomatoes. Place casserole in the oven on the bottom rack and cook for 30- 45 minutes. Stir occasionally, smashing vegetables as they cook.
Remove from oven when vegetables are soft and tender, remove thyme and bay leaf. Add basil and adjust salt and pepper to taste.
Spaghetti Squash: Place Squash on a rimmed sheet pan lined with parchment or foil, cut side down, pour 1/2 cup of water around the squash. The Squash goes into the oven after the Bohemienne has been cooking at least 20 minutes. Begin to test Squash for doneness after 20-25 minutes, by simply inserting a paring knife into the flesh. If the knife slides in and out without any resistance, your squash is done.
To Serve: Using a fork gently begin to pull the flesh of each squash way from the skin, (notice it looks like spaghetti) add a few pats of butter or olive oil, a pinch or two of salt and some fresh pepper. Divide the seasoned squash onto warm plates, top with hot Bohemienne, Parmesan and a few more leaves of basil. Enjoy the season where the end of summer meets the beginning of fall.

See you at the Market!


Chef Deb T


Friday, September 3, 2010

Agave Spiced Plum Butter

I get many requests for recipes using Agave Nectar, so I thought I would offer this little, small batch of a barely spiced, Plum Butter.  I have an event tomorrow in which I wanted to add a drizzle of something "plumy" over small wedges of lemon scented ricotta pound cake.  I loved the idea of a spiced plum butter, however most "butters" tend to be very thick, dry and a little dull when it comes to presentation.  I wanted something with a bit of shine, color and the consistency of a saucy, fruity, syrupy jam.  I can think of many many applications for this Plum Butter in it's syrupy form: add it to yogurt, oatmeal, or sweetened ricotta.  You can use this a base for sauces for pork, duck or chicken....it's even great to sweeten hot tea!

For this particular application I used Agave Nectar instead of sugar, and I did not reduce the mixture as long as a traditional butter requires. But feel free to cook the fruit longer for a thicker, spreadable condiment.


Agave Spiced Plum Butter

10-15 Plums, cleaned, pitted and roughly chopped 
1 cup water
Agave Nectar ( see note**) or sugar
1/2 teaspoon good quality cinnamon
2 pinches cloves
1 pinch fresh ground nutmeg

Place plums and water in a medium saucepan and bring to boil over high heat, cover, reduce heat and simmer for 20 minutes until fruit is tender. You many need to stir it occasionally. Remove from heat.

Process plums in a food processor or blender ( I use a Vitamix) until mixture is almost smooth, (I made mine completely smooth). Be careful when processing, mixture is hot!

**Measure the mixture, and add 1/2-3/4 cup Agave Nectar for each cup of Fruit puree. 
Or Add 1 cup - 1 1/4 cup of sugar for each cup of fruit puree.  (the amount of agave nectar you use will be determined by how sweet/ripe your fruit is at the time).

Return mixture and sweetener to the saucepan, add cinnamon and cloves and return to a gentle boil, until mixture is the desired consistency. Stir often, as it will have a tendency to stick and could burn if unattended.  Skim the foam/scum that floats to the top. ~ A mere,  1/4 teaspoon of butter, will keep foam at a minimum.

Thin sauce: 30-35 minutes
Thick spread: 50-55 minutes

Once the desired consistency is achieved add nutmeg.

You can ladle hot mixture into sterilized canning jars, and process according to manufacturers instructions.  For Colorado's altitude, I would process for 20 minutes,  for everyone else below 1000 ft., it's 10 minutes.

Or....

The butter can be store in your fridge for approximately 2 weeks or in your freezer for a year.

 Enjoy!

See you at the Market !
Saturday: Longmont Farmer's Market
Sunday: Ft Collins Farmer's Market (Harmony & Lamay)

Chef Deb


Saturday, August 21, 2010

Oven Dried Zucchini Chips

Zucchini.

We grill it, saute it, chop it, pickle it, sweeten it for muffins and cakes, and give tons of it away.

Honestly, I'm just as tired of it as everyone else.  You grow it because it's easy, you buy it because you feel you have to and you throw it away because you simply can't take it anymore.

I get more requests for zucchini recipes then any other vegetable, and it's always...."what ELSE can I do with Zucchini?" Then comes the sigh and the look of total boredom.  I fee your pain, I feel your pain.

I recently decided to "oven dry" zucchini after reading a blurb by chef/instructor John Ash, where he discusses the idea of oven drying vegetables the way we do summer tomatoes.  He suggests drying them (in addition to cauliflower, beets, carrots, even olives) to a nice concentrated chewy consistency of 70-80% dry.  It sounded good to me, so I gave it a try.

My first batch worked well, and it had a nice chewy texture. My second batch, well, I forgot them and they came out as chips.  I promptly tasted them and ate all three sheet pans (3 whole zucchini!).  Love these!! Well, as much as one can love a zucchini.....


Oven Dried Zucchini Chips

2-3 Zucchini, green or golden, washed and sliced thinly (about the thickness of a quarter)
Olive oil
Salt or seasoned salt (Savory Spice shop has some great ones)
Pepper

Line a few sheet pans with Parchment paper (not waxed paper)

Preheat oven to 250 Degrees F.

Line parchment with Zucchini coins, and lightly (very very lightly) brush or mist One side of the vegetables with Olive oil. Sprinkle lightly with salt and fresh ground pepper.  

Place sheet pan in the oven for approximately, 30-45 minutes, then rotate the pan, and continue to dry for an additional 30-45 minutes, until your zucchini is crisp. Taste, and adjust your seasonings.

Note: your oven my cook these faster or they may take longer.. It's okay to pull the ones that dry more quickly, out before the rest are done. The chips do not store very well. ( But then we keep eating them  all straight out of the oven, so you may have to let me know if they CAN be stored.) 

Enjoy and see you at the Market!

Chef Deb


Friday, August 20, 2010

Fresh Corn & Tomato Salad w/Summer Basil

Hi everyone!  It's been a long, long time.  While I have not been blogging, I have been working.

I have several bits of exciting news!

**First, we will be offering a Canning Class, September 28, 2010 at the beautiful showrooms of Mountain High Appliance, in old town Louisville.  The class will cover canning basics and will be a hands-on experience.    I will send out details over the weekend.

** Second, I have been working with Miller Farm's lately, and you can visit me at the Fort Collins Farmer's Market (Harmony & Lemay), most sundays.

** Finally, I have been hired by the St. Vrain School District to work with their food service program and help make OUR community school's lunch program reflect our growing desire to provide more nutritious local food to our kids.  The truth is, the director and her staff feed 17,000 students a day and they already receive 30% of their produce from local farms.  Think about it.. Your local school district is ALREADY thinking local, eating local and putting our tax dollars into our local economy.
   While Boulder County receives the press for what they're doing (and I am happy for them), you need to know that our forward thinking Director of Nutrition, Shelly Allen,  is doing it on a much larger scale, and with less conflict, and more buy in from her staff.    You have no idea how exciting it is to be working with someone so supportive and innovative of our community.  Keep your eyes posted for this woman's name, she's impressive and I am very lucky to be part of her program.

So, enough with the news...

No need to use the oven or stove... just cut, chop, and toss and your finished.

This is my "salad de jour" for the summer.....


Summer Corn andHeirloom Tomato Salad


4 ears fresh summer corn, husks removed, cut corn from the cob
2 large heirloom tomatoes, cored, seeded and cut into 1/2 inch pieces
(or use the small grape sized, cut in half)
1/4 of a red onion, cut into 1/4 inch pieces, rinsed in cold water
8-10 basil leaved, chopped
1/4 cup goat or sheep feta (or your favorite local cheese)
2 Strips Bacon, diced and cooked crisp (optional)
Kosher Salt
Fresh Ground Pepper
Fresh Lettuce leaves to garnish
Chives, to garnish
Basil, to garnish

Vinaigrette:
1 small clove garlic, minced
1 teaspoon Dijon mustard
3-4 Tablespoons good quality Vinegar (Champagne, red wine, Cabernet, rice wine, etc)
1/3 –1/2 cup good quality Extra Virgin Olive Oil
Salt and pepper to taste

Combine all the ingredients for the vinaigrette in a jar and shake until combined, mixture will separate, but that is fine.  Taste and adjust seasonings, it should have a nice vinegar taste (the tomatoes will mellow this out)

Combine Tomatoes, corn, and onions in a medium sized bowl, pour vinaigrette over mixture and let rest at room temperature for at least 15 minutes. Chill if not serving directly.
Before serving, stir in Basil and adjust seasonings,  place a few lettuce leaves on the salad plate, top plate with 1/2-cup corn tomato mixture, layer with feta, bacon (if using), additional basil, and chives, and fresh ground pepper. Enjoy.

**Please note: only the freshest summer vegetables work with this salad.  Most corn bought at the store will be too starchy to showcase this lovely salad. Corn used within a day or two of being picked is optimal. Also, this recipe is only a suggestion; feel free to increase the amounts, of your favorite ingredients!!


See you at the Market!

Chef Deb

Thursday, August 19, 2010

Poached Apricots w/Vanilla Bean & Honey

This recipe was a happy accident. Honestly, I was trying out a recipe I had read about in a new cookbook, where the author stated, "this is one of my favorite cakes, I'd consider moving just to be in an area with a longer apricot season for this cake". With a statement such as this, how could I resist making the cornmeal crunch cake?

Turns out, it was not even worth writing about. As I stood there scraping the pot of the last little bits of apricot vanilla bean goodness (how else would I console myself over the waste of 2 pounds of fabulous apricots?) , I realized the filling and syrup was so perfectly amazing I could forgive the author her misguided and erroneous boast.  For the record, I can salvage just about anything... but gravel would have been a better vehicle for my lovely apricots.  (** In all fairness, I might have used a local cornmeal that was too coarsely ground to do this cake justice... I will try again, as I have received several emails indicating the cake is wonderful.. so until then, please forgive my ramblings..I meant them at the time, but I humbly admit I may be wrong**)

The photo shows the cake with large slices of poached fruit on top,  and for photo purposes they are barely dipped in the syrup.  When you make this at home, it will look more like a jam with large soft pieces of fruit. Notice the golden glaze with the specks of vanilla bean...yummm! As for the cake...blleeeckk! (see note above, ;-))

The recipe we used at the market used unpeeled, chopped fruit. I prefer a combination of ripe, barely ripe, and a few slightly underripe apricots when I cook fruit, because it adds a little tartness and depth of flavor to your fruit jams/syrups.

Side Note:  Save the pits from your apricots, and pry (I used a hammer, softly) the pits open and retrieve the small almond shaped seed from inside.  In many cultures the seeds are used as a flavor agent for cookies, jams and extracts. Think Amaretto!  I boil the seeds for 20 minutes,  toast in the oven and grate them with a microplane and add them to my recipes.   I do need to include a warning:  Apricot seeds in large quantities are reported to be toxic. Please do research if you have any concerns.


Poached Apricots w/Vanilla Bean & Honey
(This is more of a fruity syrup)

2 lbs. fresh apricots, washed, pitted and chopped 
1 Tablespoon Lemon juice
3 cups water
2/3 cup sugar**
1/3 cup honey
1/2 vanilla bean, split and scraped


Toss chopped apricots with lemon juice and set aside. Combine water, sugar, honey and vanilla bean in a medium saucepan and bring mixture to a boil, and the sugar is dissolved. Continue to boil for 3-4 minutes then add the apricots. Lower the heat to medium and simmer for approximately 8-10 minutes.  Remove mixture from heat and cool. Store in a clean jar in the fridge and use as a topping for everything!  Enjoy!


Note: I like to reserve some fruit to add at the last minute to ensure I have large pieces. Or, gently slide sliced apricots into the simmering mixture for a few minutes, remove and let them cool for later use.  
Lastly, the simmering fruit will produce a little bit of scum on the top.  You may either skim it off with a spoon or add a 1/4 teaspoon of butter the the mixture and it should keep the scum to a minimum.


Peaches and plums are also excellent substitutions!


We will be at the Longmont Farmer's Market this weekend, so...
See you at the Market!!


Chef Deb


Wednesday, June 30, 2010

Chocolate Cherry Molten Cakes w/ Glazed Fresh Cherries

It's Cherry Season at the Market!

 Swoon!! Gasp!! C*H*E*R*R*I*E*S!!


DSC01601

Instead of the traditional cherry tart, cherry pie or cherry clafouti (cherries in a custard type mixture), I thought I'd appeal to your chocolate loving side. You do have one of those don't you?

I got the idea for this recipe from the Australian cooking magazine called Donna Hay.  At $10 an issue, it's a splurge, but honestly, it's worth it.  The recipes and ideas are a little more inventive and there are fewer ads....

Tuesday, June 29, 2010

Smoked Tomato Salsa

W/ Baked eggs and Potato hash!

favorite breakfast

If I had to live on just one food item my entire life, it would have to be salsa. Not just any salsa, but the kind with plenty of cilantro, a good dose of lime and just enough "kick" to make your nose run and your mouth burn. You know the kind, you're in a bit of pain but your can't stop shoveling it in because: a) it's so darn GOOD, and b) if you stop, your mouth will be on fire. Just THINKING about it makes my eyes tear up...... In my house we have a half gallon mason jar full of the stuff at any given time, and it's a good thing too, because my family seems to love it just as much as I do!

There are perhaps, a bajillion (it's in the urban dictionary!) salsas on the market at this very moment. Everyone, and I mean EVERYONE, has their own favorite recipe for salsa. Salsa, at least to me, has become rather pedestrian and I think its time you added a little personality to your tried and true recipe (and if you don't have one of your own, you may use mine and call it yours!).

The original idea for smoking tomatoes for salsa came from another chef, but we've taken it one step further by smoking the onions and the peppers too. Once again, this is a rough recipe.  I am relying on you and your wonderfully refined palate to adjust this salsa to suit your family. Also, I use a smoker for this recipe. If you do not own one and never plan to own one, make friends with your neighbors who do. At the first whiff of smoke, casually stroll your ingredients over and find some way to weasel your pan of goodies onto their smoker. Bribe, charm, promise your first born if you must, but get those tomatoes on the smoker.  Once your ingredients are smoked, you can store them in the freezer until you are ready to make salsa.

Smoke Tomato Salsa


We used hickory chips in our smoker, however apple-wood, pecan and other mild woods will also be suitable.  Personally, I find mesquite wood to be a bit too strong, but you may use it in a pinch, just cut the smoking time in half.

*1 1/2 pounds fresh summer tomatoes (use canned whole in the winter), core and cut in half
*1 med. white or yellow onion, peeled and cut into quarters
* 2-4 Fresh Jalapenos, stems removed, cut in half lengthwise
* 2 cloves fresh garlic
* 1/2 bunch cilantro 
* Juice of one lime
* 1 teaspoon Cumin
* 1-2 teaspoons Kosher salt (taste first before adding it all)
* 1/2 teaspoon ground pepper
* 1 Tablespoon olive or vegetable oil

***Soak your wood chips and follow your manufacturer's instruction for your smoker.. or take a six-pack to your new best friend and neighbor.. It might help to address him (or her, if you live next to me) as, "The Smoke Master".. let me tell you, it never hurts to offer inflated praise to the cook!! 

Coat the tomatoes, onions and pepper with olive oil, and place them in a aluminum recyclable pan ( or use an old glass pie or cake pan.. it will get very dirty but a nice old fashion brillo pad will clean it right up).
Place tomatoes on smoker and let "cook" for approximately two hours.  Cool.

Once cool, process all the ingredients in your blender or food processor, you may need to do this in batches.  Taste and adjust seasonings, adding more cilantro, lime or jalapenos.... and salt.  The flavor improves after you let it rest in the refrigerator overnight.  Now, find a deep dark scary place in your fridge to hide your Smoked Tomato Salsa....a place the rest of the family is afraid to look... Enjoy!

See you at the market!

Chef Deb T.


Saturday, June 5, 2010

Honeyacre Marinated Tomatoes


I am not at the market this week, but I did drag myself out of the house this morning for these lovely beauties... Honeyacre tomatoes!   With fresh ripe tomatoes we just use a little unfiltered olive oil, good salt, and old school powdered pepper (yes, you can use finely, finely ground fresh pepper).  We don't even waste our time surrounding these juicy morsels with lettuce. Honestly,  it's superfluous, and who really cares about about the greens when you have natures most perfect offering glistening in front of you??
All I am offering today is praise and a very simple recipe.... Thank you, Honeyacre Farms for growing the season's first crop of fabulous tomatoes and for showing us how paltry, sad and pathetic those super market tomatoes are. 


Easy Marinated Tomatoes

4-5 Honeyacre Tomatoes (I'd get at least 2 more..as most will not make it into your recipe)
1/2 cup sherry, Cabernet Sauvignon, Pinot Noir vinegar
1/2 cup extra virgin olive oil
2 Tablespoons minced Shallots
3 Tablespoon finely chopped chives
1-2 teaspoons kosher salt (Fleur De Sel works great)
1 teaspoon finely ground pepper

Core tomatoes and cut in to big chunky pieces. Place tomatoes in medium bowl, drizzle with vinegar, olive oil, and sprinkle in the shallots and half of the chives. Season with salt and pepper and toss gently.  Let tomatoes marinate for an hour, either on the counter or in the fridge. When ready to serve, taste and adjust seasonings, and garnish with the last half of the chives.  Enjoy!

*Note: We use the left over juice/marinade to make vinaigrette or to drizzle over sandwiches

See you at the market!

Chef Deb

Thursday, June 3, 2010

Handmade Graham Crackers


First of all, these (the dough and the cookie) are so addictive, I am having trouble getting them baked AND off the cookie sheet. The fact that they are made with whole wheat flour, local honey and wheat germ only adds to my delusional beliefs that it's okay, dare I say healthy, to eat this in heaping spoonfuls.... Hhhmm, whole grains, fiber, wheat germ, eggs...now, if I can dip them in peanut butter and chocolate, this could be a new breakfast item in our house!!

This is a classic Martha Stewart recipe, and I honestly believe it is one of the best. I have experimented using more whole wheat flour (less white) as well as increasing the amount of cinnamon in the recipe, both with great success. I also just cut mine into squares or some sort of fun shape, having a "classic" representation of store bought crackers has no appeal to me what so ever...

I hope you give these little cookies a try, and if you need assistance or help resisting eating the whole batch... just call me, I will personally relieve you of any unnecessary cookie dough.

Martha Stewart's Graham Cracker Recipe

Makes 20
. 1 1/2 cups all-purpose flour, plus more for working
. 1 cup whole-wheat flour, local Colorado Whole wheat works well.
. 1/2 cup untoasted wheat germ
. 1/2 teaspoon salt
. 1 teaspoon baking soda
. 1 teaspoon ground cinnamon
. 1 cup unsalted butter, softened (2 sticks)
. 3/4 cup packed light-brown sugar
. 2 tablespoons high-quality, local honey
Directions
. Preheat oven to 350 degrees. Whisk flours, wheat germ, salt, baking soda, and cinnamon in a medium bowl; set aside.
. Put butter, brown sugar, and honey into the bowl of an electric mixer fitted with the paddle attachment; mix on medium speed until pale and fluffy, 2 to 3 minutes, scraping down sides of bowl as needed. Reduce speed to low. Add the flour mixture, and mix until combined.
. Turn out dough onto a floured surface, and divide into quarters. Roll out each piece between 2 sheets of floured parchment paper into rectangles a bit larger than 9 by 6 inches, about 1/8 inch thick.
. Using a fluted pastry wheel, trip the outermost edges or each rectangle, and divide into three 6 by 3-inch rectangles. Pressing lightly, so as not to cut all the way through, score each piece in half lengthwise and crosswise, to form four 3 by 1 1/2-inch crackers. Stack parchment and dough on a baking sheet and chill in freezer until firm, about 20 minutes.
. Remove two sheets of dough from freezer. Pierce crackers using the tines of a fork. Transfer to large baking sheets lined with parchment paper. Bake, rotating halfway through, until dark golden brown, 8 to 9 minutes. Repeat with remaining dough. Let cool on sheet 5 minutes; transfer crackers to wire racks to cool completely.


* These are my Grahams in The Round.  I slightly under bake them and use them for desserts and ice cream sandwiches or open faced custom  s'mores.
* This dough is VERY forgiving! It can be re-rolled countless times and still come out perfect.


I hope you give these a try.


See you at the Market!
Chef Deb


Please, support your local farmers and food producers by visiting YOUR local Farmer's Market. It's a great experience, you strengthen your community, and YOU keep valuable dollars where they matter most...in the place you call home!  See ya there!

Sunday, May 30, 2010

Pickled Radishes

IMG_0674

(iphone photo)

If you've been to any farmer's market lately, (and I do hope you will try to visit them), you will notice tons of spring radishes. Either in a salad, on a crudite platter or just by themselves, the radish is a much overlooked, and dare I say, neglected, vegetable. Many people either love them or hate them, and most usually have them the same way. I'd like you to look at this sad, D-list vegetable, with a new perspective and move it to the front of your spring recipe repertoire. Here are two ideas to get you started.

This week, we reintroduced last year's popular, sauteed radish recipe to the same comments we heard before...

"Sauteed Radishes?" Yes!

"Who ever heard of sauteing a radish?" Well, besides me, about 49,000 others (according to a google search!)

"Wow, this is really good/great/delicious!!" I know, that's why we did it....

A few uses for sauteed Radishes:
**Add sliced Sauteed radishes to fresh grilled Asparagus, for a colorful spring side dish.
**Try mixing chilled sauteed radishes with unsalted butter, sea salt on toasted baguette slices, for an updated twist, on a French classic.
**We also saute radishes, drizzle them with olive oil, and reduced balsamic vinegar and heap them on toasted Crostini for a lovely and different starter. ( I also throw in a few sauteed radish greens for color and added flavor. Please, make sure you clean the greens completely as they are usually very, very sandy).

The second way we showcased these zippy little red globes of goodness, is...by quick pickling them.

If you're a fan of asian food and specifically, Korean food, you may have had the opportunity to try a pickled radish. They are wonderful and go very well with rich grilled meats and summer picnic foods. It's a lovely and unexpected departure from the classic cucumber pickle, and to use what's fresh and in season.

I found this recipe in one of my cookbooks, ad hoc at home by Thomas Keller In his original recipe (it's perfect, by the way). Chef Keller uses a 2:1 ratio for vinegar to water/sugar mixture for his pickling solution. I have changed it a bit to reflect my tastes and added salt and a bay leaf.

Pickling Solution**
1 cup vinegar (champagne, red wine, rice wine, etc.,)
1/2 cup sugar
1/2 cup water
1/4-1/2 teaspoon Kosher or sea salt (optional)
1 fresh bay leaf (optional)
6 black peppercorns (optional)

The mixture is heated to a boil, until the sugar dissolves, then it is removed from the heat and allowed to cool.
**Please note: this recipe is for a quick, refrigerator pickle and may not be suitable for canning and storing.

Pickled Radishes

2-3 bunches of radishes, cleaned, trimmed sliced
1 recipe of pickling solution, cooled
2 pint sized canning jars or storage container with lid

Divide radishes into jars and cover with cooled pickling solution. Seal jars tightly and store in refrigerator until ready to use. They are best if you let them rest for at least 8 hours before eating. Pickles will keep for a month. Enjoy!

See you at the market!
Chef Deb


Sunday, May 16, 2010

Sauteed Hon Tsai Tai w/Creamy Polenta

Hon Tsai Tai (pronounced HON-sie-tie) is a mild Asian green from the Mustard family. Yet, I would describe it more along the lines of a sweet, less bitter, broccoli raab. The absolute fabulous thing about this gorgeous green is, you use the whole plant: Flowers, buds, leaves, stems.

In all honesty, I had never even heard of it before. But when I opened my email one morning, I was greeted by Mark, from Ollin Farms, asking if I would be willing to do a little research and share a recipe or two with all our good friends at the farmer's market.

This is precisely the kind of challenge I love.

In fact, I think if you dangle a few "Hon Tsai Tia's" in front of most chefs/cooks/food nerds you can gently led us to do just about anything! If you only knew how excited I get when my phone rings at 7:15a, and it's a local farmer saying, "Chef, you need to come out and see......." My heart starts racing like a big haired Texas girl near a jewelry store!

Most of the recipes I found were for Asian dishes. Asian greens equals asian recipes, right? Not in my book. As many of you know, I rarely do what's expected. Besides, this past saturday was COLD and I needed something that would make people stop and savor this unique little vegetable. Besides, when everyone's mouths are full, it's the perfect opportunity for me to talk about our amazing farmer's market.

As with many of my recipes this is a suggestion. I want all of you who have to measure everything perfectly, to put down your measuring spoons and slide rules and just have fun with this.

Note: We currently do not sell Polenta (that's big yellow grits to all my southern readers/family), but we do have a farmer who is experimenting with it this season, and we may see some of it this fall.

Sauteed Hon Tsai Tai w/ Creamy Polenta


First, cook Polenta according to the package directions. I use Bob's Red Mill Corn Grits and it takes about 30-40 minutes to cook. Of course, before we serve it, I add butter and Parmesan to the pot, then I taste it, and add more butter and Parmesan.

**If you are local, feel free to substitute Haystack Goat Cheese (any of their selections would be amazing) in place of the Parmesan.
**To all my Texas family and friends... you can add jalapenos, and cheddar cheese to your grits and you will most likely have to add a pound or two of cooked chopped bacon to the greens to get your guy to eat it. Just tell him it's parsley....


Sauteed Hon Tsai Tai
1/2 yellow onion, diced or 1/2 cup ramps, Chopped
2 TB Extra Virgin Olive Oil
1 Bunch Hon Tsai Tai, roughly chopped. Use the whole plant.
2 pinches hot pepper flakes
Salt
Pepper

Heat a large saute pan over medium high heat, add oil, wait 30 seconds and add onions, or ramps and cook/saute until they begin to color. Next, add the greens and red pepper flakes, lower the heat to medium and cover pan with lid and allow greens to cook for about 5-7 minutes ( or longer depending on the tenderness of the stalk). Taste, season with salt and pepper and serve over creamy polenta. I usually drizzle a little good quality, unfiltered olive oil over the dish and serve.

The great news this week is that Ollin Farms sold out of the Hon Tsai Tai before we finished our demo. If you missed out, please look for it next week at the Longmont Farmer's Market or stop by their farm stand during the week.

Have a fabulous day and as always,

I will see you at the Market!

Chef Deb