Saturday, June 5, 2010

Honeyacre Marinated Tomatoes


I am not at the market this week, but I did drag myself out of the house this morning for these lovely beauties... Honeyacre tomatoes!   With fresh ripe tomatoes we just use a little unfiltered olive oil, good salt, and old school powdered pepper (yes, you can use finely, finely ground fresh pepper).  We don't even waste our time surrounding these juicy morsels with lettuce. Honestly,  it's superfluous, and who really cares about about the greens when you have natures most perfect offering glistening in front of you??
All I am offering today is praise and a very simple recipe.... Thank you, Honeyacre Farms for growing the season's first crop of fabulous tomatoes and for showing us how paltry, sad and pathetic those super market tomatoes are. 


Easy Marinated Tomatoes

4-5 Honeyacre Tomatoes (I'd get at least 2 more..as most will not make it into your recipe)
1/2 cup sherry, Cabernet Sauvignon, Pinot Noir vinegar
1/2 cup extra virgin olive oil
2 Tablespoons minced Shallots
3 Tablespoon finely chopped chives
1-2 teaspoons kosher salt (Fleur De Sel works great)
1 teaspoon finely ground pepper

Core tomatoes and cut in to big chunky pieces. Place tomatoes in medium bowl, drizzle with vinegar, olive oil, and sprinkle in the shallots and half of the chives. Season with salt and pepper and toss gently.  Let tomatoes marinate for an hour, either on the counter or in the fridge. When ready to serve, taste and adjust seasonings, and garnish with the last half of the chives.  Enjoy!

*Note: We use the left over juice/marinade to make vinaigrette or to drizzle over sandwiches

See you at the market!

Chef Deb

Thursday, June 3, 2010

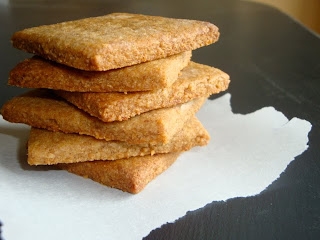
Handmade Graham Crackers


First of all, these (the dough and the cookie) are so addictive, I am having trouble getting them baked AND off the cookie sheet. The fact that they are made with whole wheat flour, local honey and wheat germ only adds to my delusional beliefs that it's okay, dare I say healthy, to eat this in heaping spoonfuls.... Hhhmm, whole grains, fiber, wheat germ, eggs...now, if I can dip them in peanut butter and chocolate, this could be a new breakfast item in our house!!

This is a classic Martha Stewart recipe, and I honestly believe it is one of the best. I have experimented using more whole wheat flour (less white) as well as increasing the amount of cinnamon in the recipe, both with great success. I also just cut mine into squares or some sort of fun shape, having a "classic" representation of store bought crackers has no appeal to me what so ever...

I hope you give these little cookies a try, and if you need assistance or help resisting eating the whole batch... just call me, I will personally relieve you of any unnecessary cookie dough.

Martha Stewart's Graham Cracker Recipe

Makes 20
. 1 1/2 cups all-purpose flour, plus more for working
. 1 cup whole-wheat flour, local Colorado Whole wheat works well.
. 1/2 cup untoasted wheat germ
. 1/2 teaspoon salt
. 1 teaspoon baking soda
. 1 teaspoon ground cinnamon
. 1 cup unsalted butter, softened (2 sticks)
. 3/4 cup packed light-brown sugar
. 2 tablespoons high-quality, local honey
Directions
. Preheat oven to 350 degrees. Whisk flours, wheat germ, salt, baking soda, and cinnamon in a medium bowl; set aside.
. Put butter, brown sugar, and honey into the bowl of an electric mixer fitted with the paddle attachment; mix on medium speed until pale and fluffy, 2 to 3 minutes, scraping down sides of bowl as needed. Reduce speed to low. Add the flour mixture, and mix until combined.
. Turn out dough onto a floured surface, and divide into quarters. Roll out each piece between 2 sheets of floured parchment paper into rectangles a bit larger than 9 by 6 inches, about 1/8 inch thick.
. Using a fluted pastry wheel, trip the outermost edges or each rectangle, and divide into three 6 by 3-inch rectangles. Pressing lightly, so as not to cut all the way through, score each piece in half lengthwise and crosswise, to form four 3 by 1 1/2-inch crackers. Stack parchment and dough on a baking sheet and chill in freezer until firm, about 20 minutes.
. Remove two sheets of dough from freezer. Pierce crackers using the tines of a fork. Transfer to large baking sheets lined with parchment paper. Bake, rotating halfway through, until dark golden brown, 8 to 9 minutes. Repeat with remaining dough. Let cool on sheet 5 minutes; transfer crackers to wire racks to cool completely.


* These are my Grahams in The Round.  I slightly under bake them and use them for desserts and ice cream sandwiches or open faced custom  s'mores.
* This dough is VERY forgiving! It can be re-rolled countless times and still come out perfect.


I hope you give these a try.


See you at the Market!
Chef Deb


Please, support your local farmers and food producers by visiting YOUR local Farmer's Market. It's a great experience, you strengthen your community, and YOU keep valuable dollars where they matter most...in the place you call home!  See ya there!

Sunday, May 30, 2010

Pickled Radishes

IMG_0674

(iphone photo)

If you've been to any farmer's market lately, (and I do hope you will try to visit them), you will notice tons of spring radishes. Either in a salad, on a crudite platter or just by themselves, the radish is a much overlooked, and dare I say, neglected, vegetable. Many people either love them or hate them, and most usually have them the same way. I'd like you to look at this sad, D-list vegetable, with a new perspective and move it to the front of your spring recipe repertoire. Here are two ideas to get you started.

This week, we reintroduced last year's popular, sauteed radish recipe to the same comments we heard before...

"Sauteed Radishes?" Yes!

"Who ever heard of sauteing a radish?" Well, besides me, about 49,000 others (according to a google search!)

"Wow, this is really good/great/delicious!!" I know, that's why we did it....

A few uses for sauteed Radishes:
**Add sliced Sauteed radishes to fresh grilled Asparagus, for a colorful spring side dish.
**Try mixing chilled sauteed radishes with unsalted butter, sea salt on toasted baguette slices, for an updated twist, on a French classic.
**We also saute radishes, drizzle them with olive oil, and reduced balsamic vinegar and heap them on toasted Crostini for a lovely and different starter. ( I also throw in a few sauteed radish greens for color and added flavor. Please, make sure you clean the greens completely as they are usually very, very sandy).

The second way we showcased these zippy little red globes of goodness, is...by quick pickling them.

If you're a fan of asian food and specifically, Korean food, you may have had the opportunity to try a pickled radish. They are wonderful and go very well with rich grilled meats and summer picnic foods. It's a lovely and unexpected departure from the classic cucumber pickle, and to use what's fresh and in season.

I found this recipe in one of my cookbooks, ad hoc at home by Thomas Keller In his original recipe (it's perfect, by the way). Chef Keller uses a 2:1 ratio for vinegar to water/sugar mixture for his pickling solution. I have changed it a bit to reflect my tastes and added salt and a bay leaf.

Pickling Solution**
1 cup vinegar (champagne, red wine, rice wine, etc.,)
1/2 cup sugar
1/2 cup water
1/4-1/2 teaspoon Kosher or sea salt (optional)
1 fresh bay leaf (optional)
6 black peppercorns (optional)

The mixture is heated to a boil, until the sugar dissolves, then it is removed from the heat and allowed to cool.
**Please note: this recipe is for a quick, refrigerator pickle and may not be suitable for canning and storing.

Pickled Radishes

2-3 bunches of radishes, cleaned, trimmed sliced
1 recipe of pickling solution, cooled
2 pint sized canning jars or storage container with lid

Divide radishes into jars and cover with cooled pickling solution. Seal jars tightly and store in refrigerator until ready to use. They are best if you let them rest for at least 8 hours before eating. Pickles will keep for a month. Enjoy!

See you at the market!
Chef Deb